How to Draft Sleeves

Oh the joy of sleeves. Drafting can be fun.

Here’s how to do it

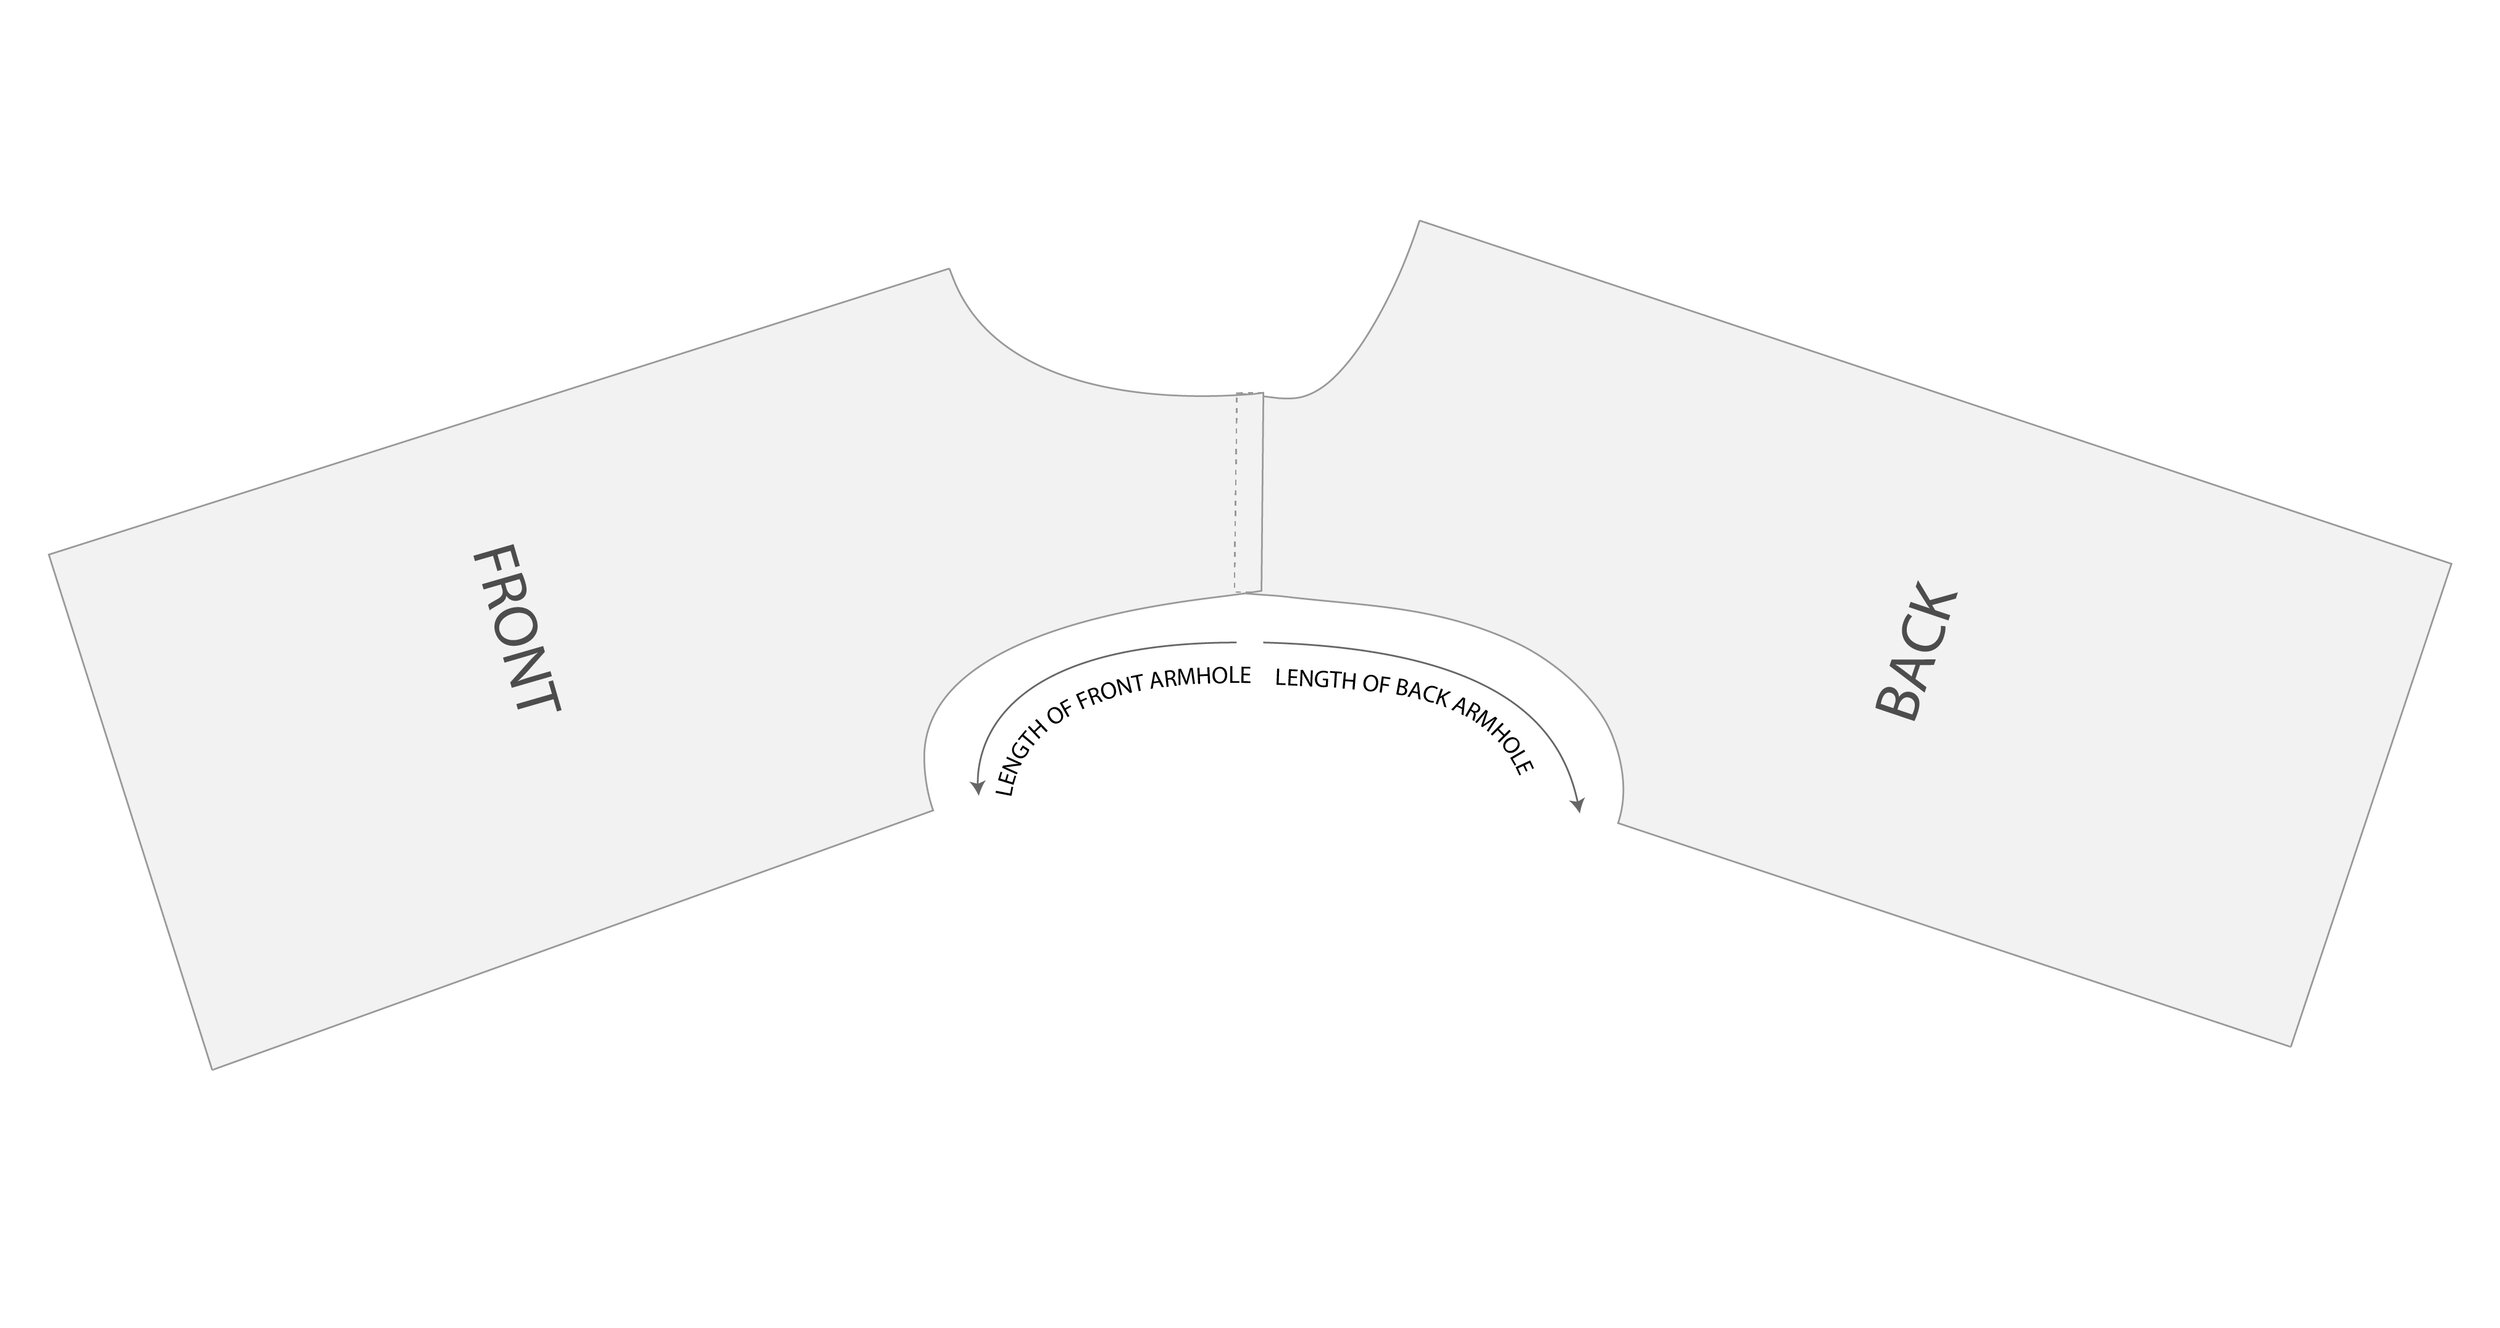
Step 1: Measure the length of the front and back armhole.

You can sew the shoulders together and then measure, or measure the pattern pieces and remove the shoulder seam allowance from the measurement.

BlueberryArtboard 9.jpg

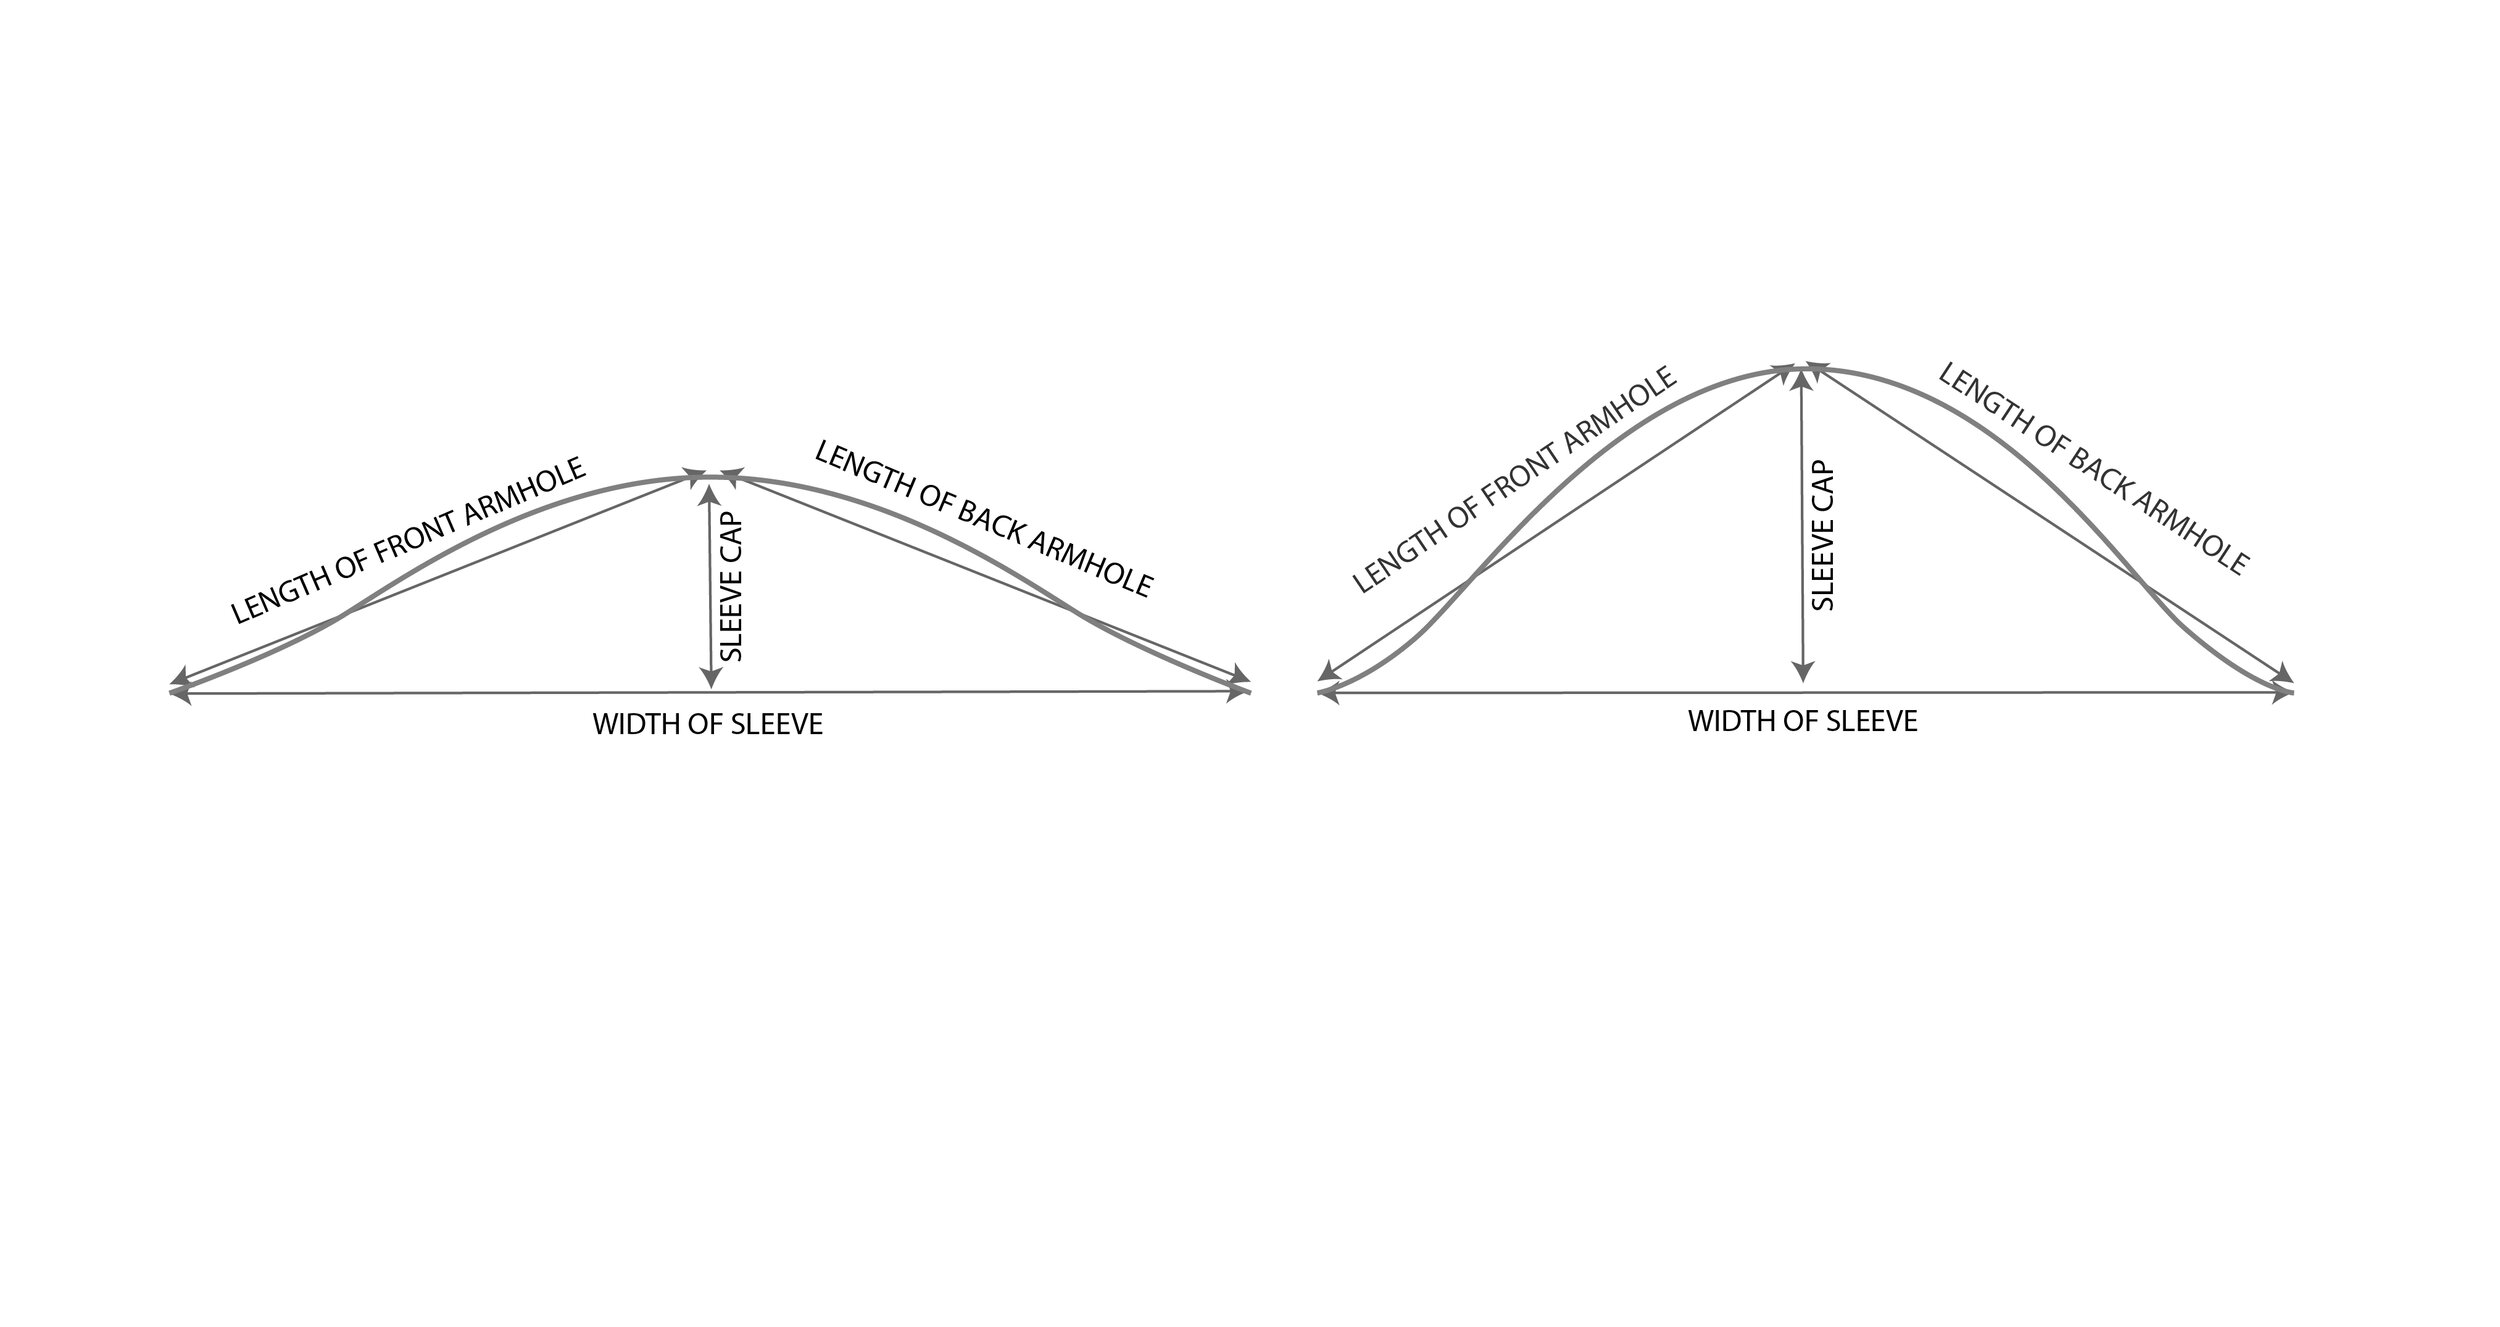
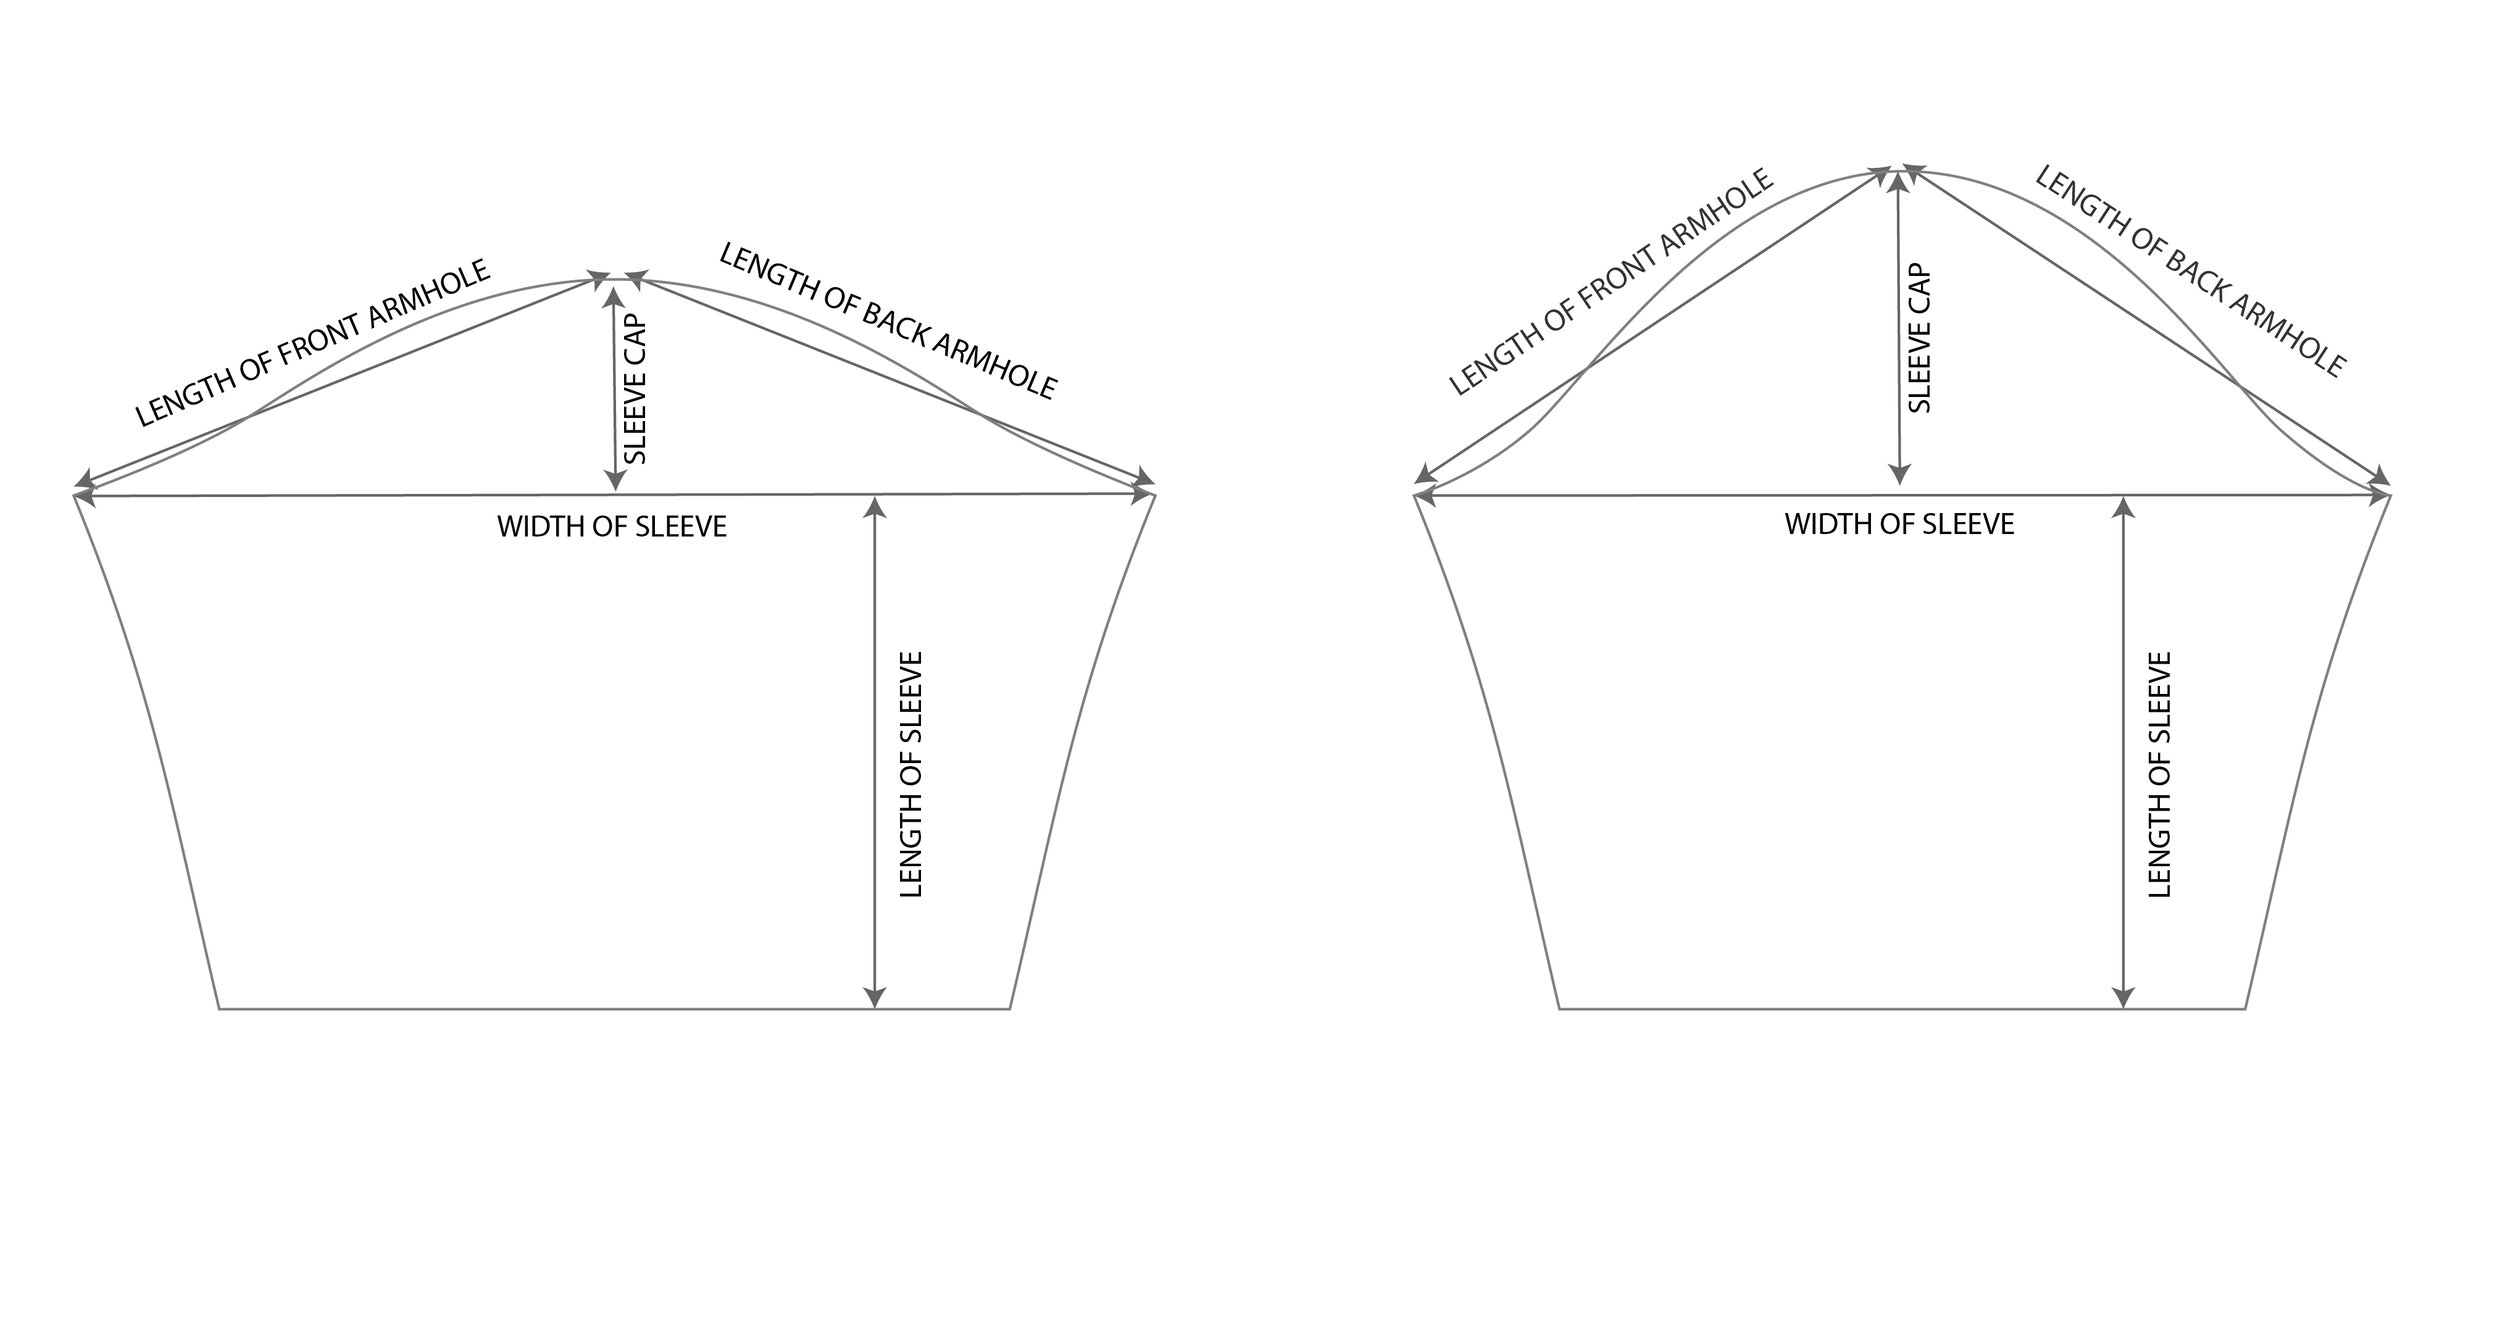
Step 2: Make a triangle using the armhole measurements where the length of the legs are equal to the length of the front and back armhole.

The steepness of the angle of the legs depends on how wide you want the sleeve to be and/or how deep you want the sleeve cap (we’ll look more deeply at pros and cons of each later in the post).

BlueberryArtboard 10.jpg

Here is an example of two different angles. Notice the shallower the angle, the wider the sleeve and the shorter the sleeve cap. The steeper the angle, the narrower the sleeve and the longer the sleeve cap.

BlueberryArtboard 13.jpg

Step 3: Draw a nice swooping curve that follows the angle of the triangle legs.

Sleeves are quite forgiving, so don’t get too hung up on the shape of the curve. But here are some things to keep in mind.

a) Many sleeve curves go under the triangle in the bottom section, and then even more over the triangle near the top section.

b) It’s normal for the total length of the sleeve curve to be about 1” (2.5 cm) longer than the total length of the armholes. A little ease is good in the sleeve curve.

BlueberryArtboard 12.jpg

Step 4: Decide how long you want the sleeve to be and if you want the sleeve to taper in.

BlueberryArtboard 11.jpg

That’s it! You can totally do it! Just play and have fun with it.

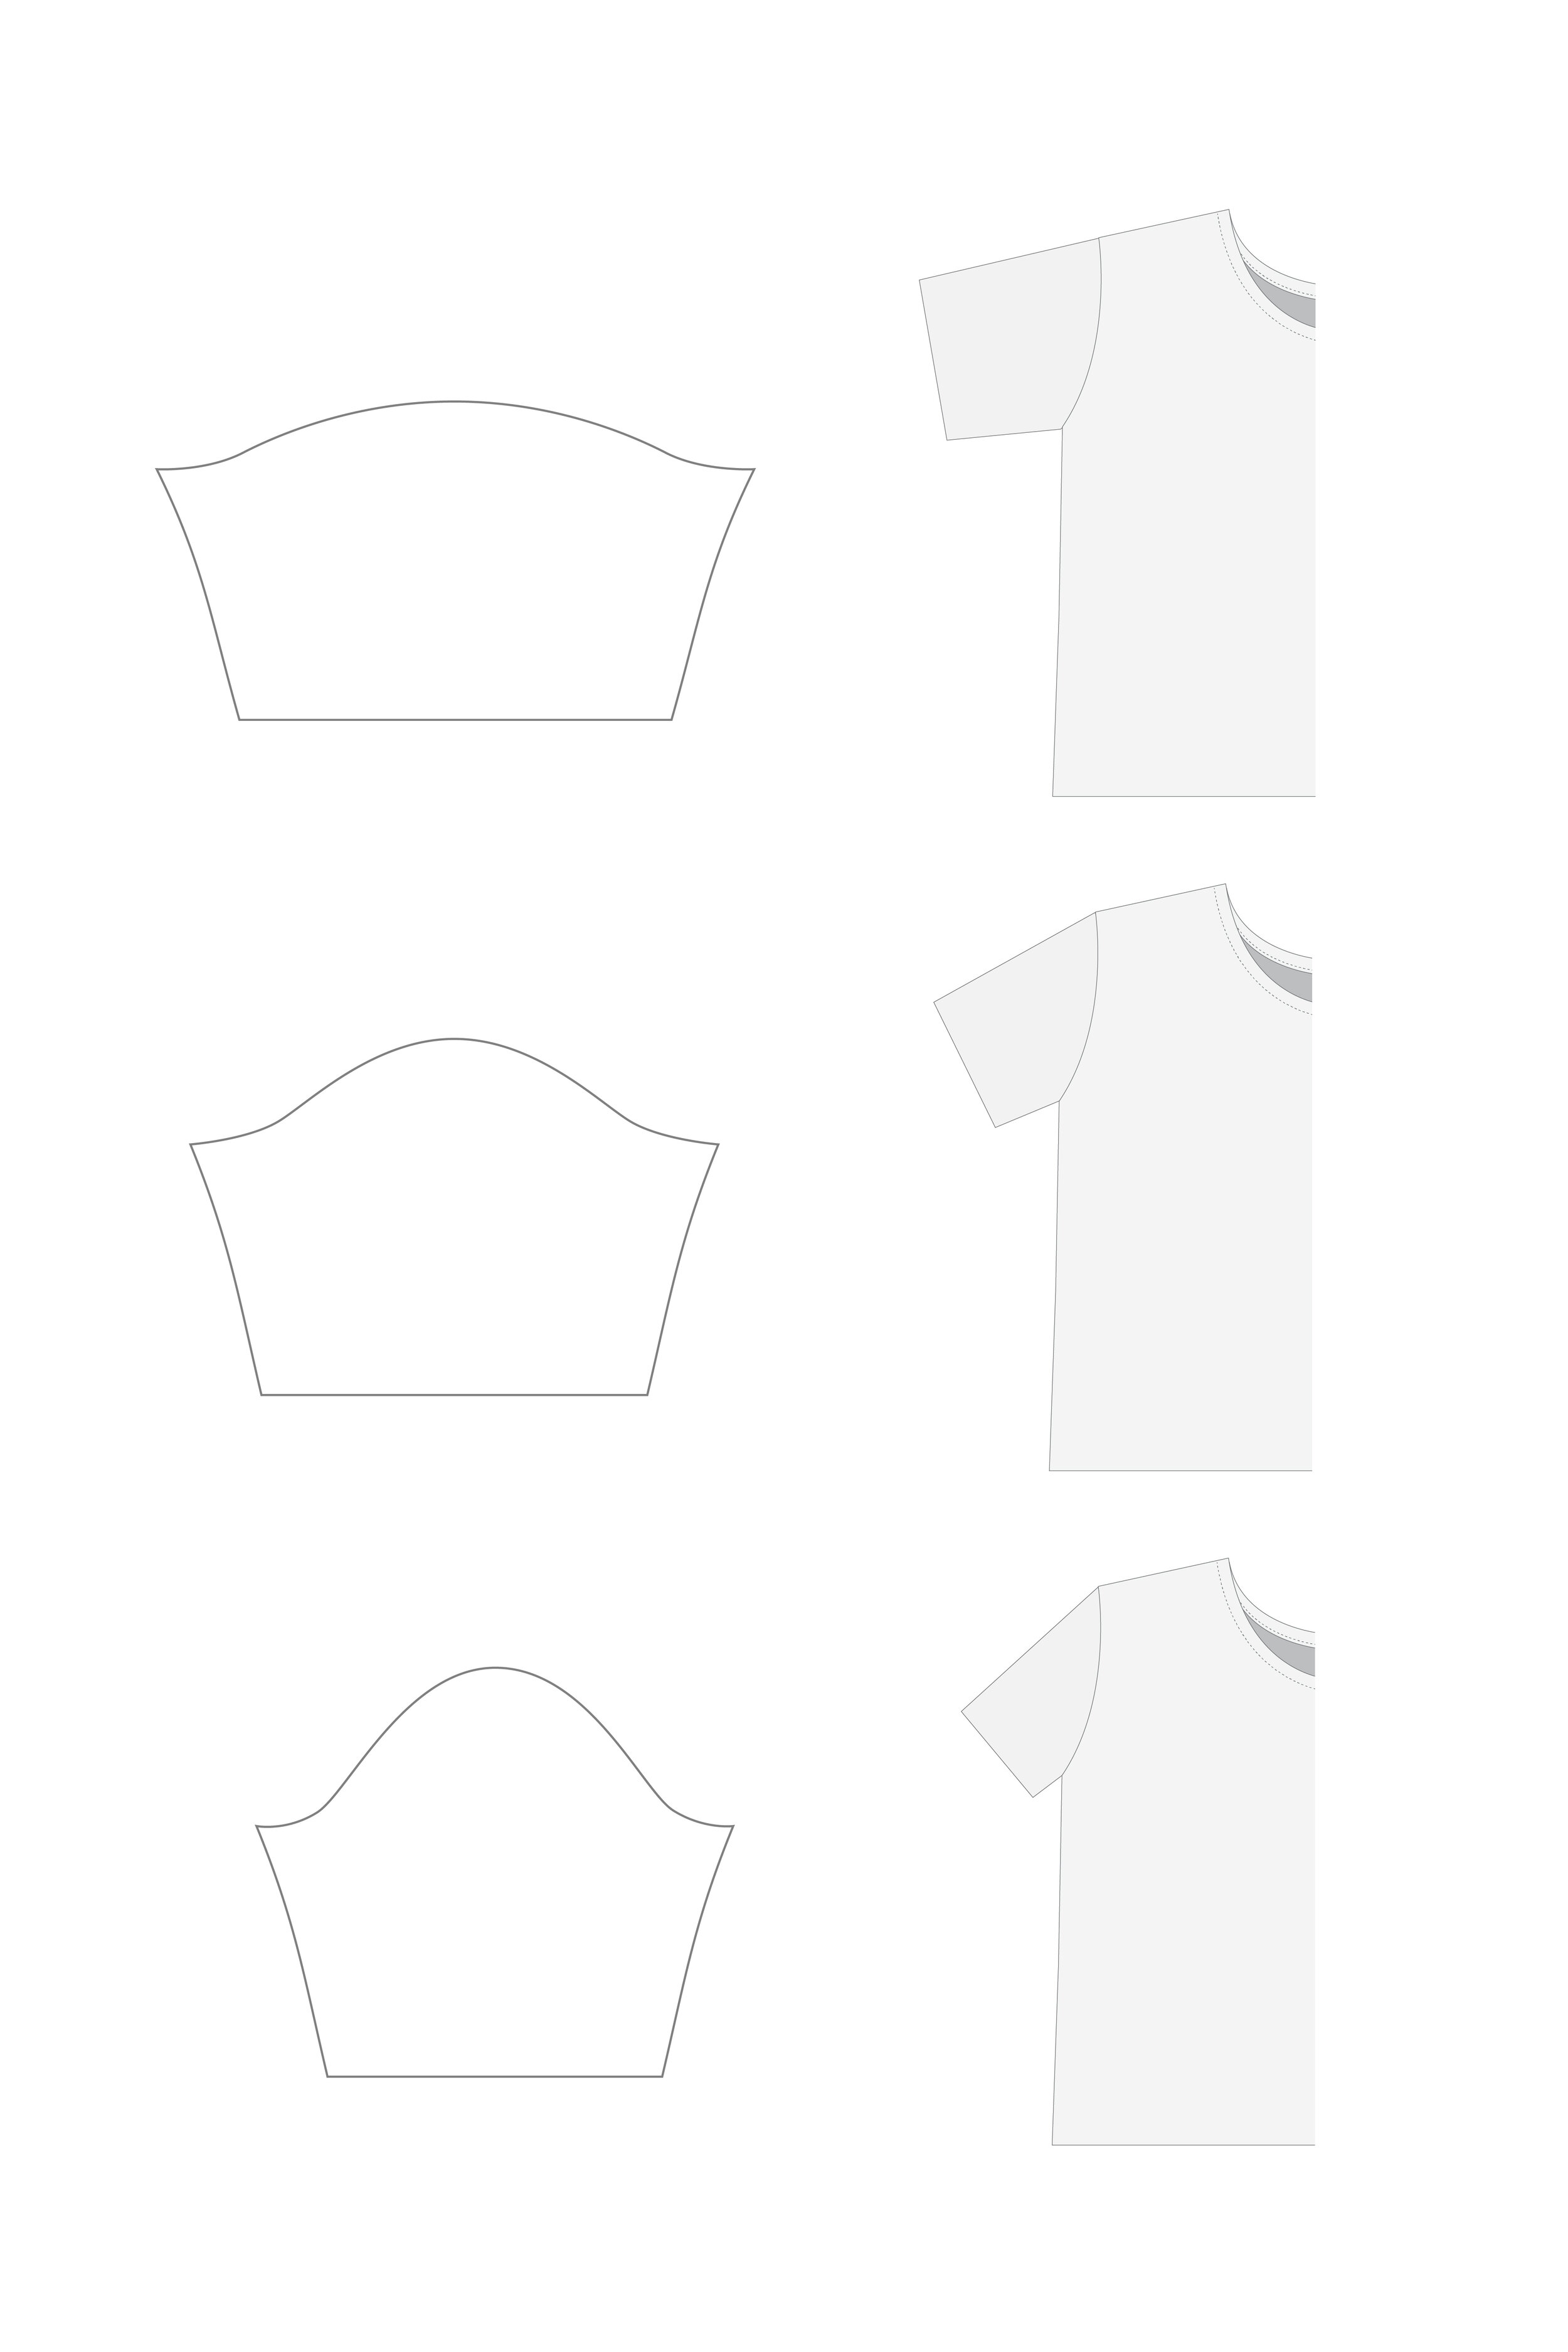
Sleeve Angle and Width

Here are examples of what different triangle angles look like on a shirt.

  • Wide sleeves with short sleeve caps will point out from the shirt. Lots of athletic shirts and casual sweatshirts have this angle because when you raise your arms, it doesn’t pull the whole shirt up with them. When your arms are down, there is excess fabric around your armpits.

  • Medium wide sleeves with medium sleeve caps are similar to a basic t-shirt. They give you room to move, but don’t have too much excess fabric around your armpits when your arms are down.

  • Narrow sleeves with high sleeve caps will point down sharply from the shoulder. Lots of professional clothing uses this angle for a clean profile that doesn’t have a lot of excess fabric around the armpit. It looks nice, but the downside is if you ever do have to raise your arms, your whole shirt is coming up with them!

BlueberryArtboard 3.jpg

What if I want a sleeve that points out but is really narrow?

Good question. If you want a sleeve that points out (has a short sleeve cap) but is also really narrow, here are some things to play with. You can make the armhole smaller on the front and back bodice pattern pieces by raising up the bottom of the armhole and readjusting the armhole curve. Or you can try a drop shoulder and make the shoulder angle whatever you’d like and the width of the sleeve whatever you’d like. There is something to be said for the freedom that drop shoulders offer!

Adjusting Sleeve Patterns

If you have a sleeve pattern already that you want to adjust to fit a different shirt, here are some adjustments you can make.

If you need to add length to the curve, you can either increase the sleeve cap height, increase width, or a combination of both.

BlueberryArtboard 14.jpg

If you need to reduce the length of the curve, you can either decrease the sleeve cap height, decrease width, or a combination of both.

BlueberryArtboard 15.jpg

Sleeves can be frustrating, sleeves can be fun. Don’t let them get the best of you. Give them your best playful attitude of enjoyment.

Adventures in Quilted Clothes

Mid winter feels like the perfect time to make a quilted jacket.

Quilted jacket - Sarah Kirsten

I used a linen/cotton blend for the outer fabric and since I couldn’t wait for cotton batting to arrive, sweatshirt material acted as the insulation layer.

Sewing a quilted jacket - Sarah Kirsten

With all the layers lined up and sandwiched together, I pined the them together in many places with safety pins.

Sewing a quilted jacket - Sarah Kirsten

I marked one line going all the way up and down, one line going all the way across to act as a starting stitching guide. I sewed along the up and down line first, then picked an approximate equal distance from the first line of stitching to sew all the other lines.

Sewing a quilted jacket - Sarah Kirsten
_U5A0628.jpg

Once all the pieces were quilted, I trimmed up the edges and sergered all the way around before sewing them together into a jacket.

Sewing a quilted jacket - Sarah Kirsten

I recently wrote an article on The Thread in my series of guest blog posts about winter being a wonderful impetus for pursuing your creative ideas.

Here is an excerpt:

“Spring is an invitation to plant gardens and tap maple trees for their sweet sap, summer is an invitation to collect hickory husks for dyeing linen (and picking mulberries to eat), fall is an invitation to chop down trees for firewood, and unlike the others, the dreaded winter is a special invitation for creativity.

Recently I read something my sister, Anna, wrote describing the importance of being truthful in creative nonfiction writing. She had a very interesting insight. She said that creativity doesn’t thrive in the absence of boundaries, rather, creativity flourishes within the constraints of boundaries. Limits are actually the best fuel for creation.”

You can read the full article here!

The No Sweat Guide to Selecting Sweatshirt Fabric

Sweatshirt fabric guide - Sarah Kirsten

Here is a fun guide for selecting the perfect fabric to make your ideal Sweet Pea Sweatsuit vision a reality.

What is this fabric called?

It’s called sweatshirt fabric (even if making pants) and is in the knit category on websites and in stores.

Stretchy vs non stretchy

There are stretch and non stretch sweatshirt fabrics. The non stretch is easier to manage on the sewing machine. If you are a beginner, I recommend getting non stretch.

Fabric descriptions don’t always say if it has stretch or not, so don’t sweat it too much if you can’t find it in the description. It will turn out beautifully either way, just an extra good challenge to sew when it has some stretch.

Fabric weight

Here are some descriptions to serve as a starting point for figuring out weight.

10 oz — This is on the light side of the sweatshirt fabric spectrum. It’s heavier than a t-shirt weight, but quite a light sweatshirt. It barely crosses over into sweatshirt-land from long-sleeve-shirt-land.

I don’t recommend this weight for the Sweet Pea Sweatsuit and mention it mostly for the context of understanding sweatshirt fabric weight, but if you want a really lightweight sweatsuit, this would be a good option.

14 oz — This is solidly in the middle of sweatshirt-land. Not one you wear on the coldest of winter nights, but one you grab to go on a picnic on a cool summer evening, or use to layer underneath a puffy jacket as you fly down the hillside on your childhood sled.

20 oz - The most delicious of all fabrics in sweatshirt-land. Thick, firmly soft, confidently durable, wears beautifully with time. This is the one to go with if you want a long lasting sweatsuit that makes you feel extra held together and hugged. A sweatsuit to go through years of memories with you. Think of the thickest hoodie you’ve ever owned or wanted to steal from your sister. This is it.

Fabric content

I recommend 100% cotton fabrics because they age well with wear. Have you ever found one of those cool thick sweatshirts from a thrift store or family member that is 20 or 30 years old and maybe has some holes and the trim is a little tattered but you love it and wear it anyway because it’s so soft? Those are usually 100% cotton sweatshirts.

Ribbing

Ribbing is used for the cuffs, waistband, and neckband on sweatshirts. Although ribbing is it’s own category within knit fabrics and works the best, you can use any thick-ish knit fabric that has 20% or more stretch.

The ideal fabric for the cuffs, waistband, and neckband is high stretch and high recovery knit. “Recovery” is when a fabric goes back to its original width and shape after being stretched.

This is 100% cotton sweatshirt fabric in 16 oz weight.

This is 100% cotton sweatshirt fabric in 16 oz weight.

This is 100% cotton sweatshirt fabric in 16 oz weight. Cuffs, waistband, and neckband is high stretch, high recovery ribbing.

This is 100% cotton sweatshirt fabric in 16 oz weight. Cuffs, waistband, and neckband is high stretch, high recovery ribbing.

This is 100% cotton sweatshirt fabric in 20 oz weight.

This is 100% cotton sweatshirt fabric in 20 oz weight.

This is 100% cotton sweatshirt fabric in 20 oz weight.

This is 100% cotton sweatshirt fabric in 20 oz weight.

All of the fabric used to make samples for these patterns came from Nick of Time Textiles. They have a delicious selection. (Not sponsored)

Tiny Art

One quite busy day, a gentle idea whispered inside and said, “why not make a tiny art show above your shoes?” So I put down whatever I was doing and got out my art supplies.

Here’s one fun way to make a tiny art show for your space

1) Find some paper. Measure out the size you want the finished tiny pieces (this is a 4”x6” card) and draw cut lines.

Tiny Art - Sarah Kirsten

2) Pick out some colors that make you happy. Start drawing on the other side of the paper.

Tiny Art - Sarah Kirsten

3) Draw more.

Tiny Art - Sarah Kirsten

4) And more.

Tiny Art - Sarah Kirsten

5) And more. Until all the spaces you want are filled with color you like.

Tiny Art - Sarah Kirsten

6) Then turn the paper over and cut along the lines.

Tiny Art - Sarah Kirsten

7) Pick out your favorite pieces of the bunch. Stick your favorite pieces to the wall in a place that brings you delight.

Tiny Art - Sarah Kirsten

And after I finished, I went back to my busy day feeling refreshed, fulfilled, and delighted.

Painting Wall

One of my friends, in reference to a small gathering I hosted, recently said, “it was a nice reminder that your house doesn’t have to be done for it to feel warm and welcoming.”

Hosting is kind of scary to me. Will they like my food? Will it be awkward? Will everyone leave feeling heard and built up and encouraged? Will I make a fool of myself in some way?

I don’t know. But at least I have my wall of paintings. Perhaps that’s enough.

My House - Sarah Kirsten

How to Make Your Own Quilted Mask Design

Want to make a quilted mask with your own quilt design?

Here’s how to do it!

Supplies you’ll need:

  • Mask pattern (a great option is the Melon Mask!)

  • Paper

  • Pen

  • Paper Scissors

  • Ruler

How to Make Your Own Quilted Mask Design - tutorial with tons of photos by Sarah Kirsten

1) Fold the mask pattern in half and trace around it.

How to make your own quilted mask design
How to Make Your Own Mask Quilted Design - Tutorial with tons of photos

2 - the fun step) Draw whatever quilt design you would like to have on the mask.

How to Make Your Own Quilted Mask Design - Sarah Kirsten

3) Cut along the lines to cut out the individual pieces. In this case there are 3 pieces. Lay them on the paper in the order that they will be sewn together. (Be sure to lay them with plenty of space in between.) Trace around each piece.

How to Make Your Own Quilted Mask Design - Tutorial with tons of photos

4) Add 3/8” (1 cm) seam allowance to all the sides that will be sewn to another piece. (You only need to add the seam allowances where you’re sewing pieces together as a result of your new design. For example, the curved nose piece doesn’t need a seam allowance added because that was already built into the pattern.)

Don’t worry about what the ends of the seam allowances look like for now. You will true them up in a few steps.

How to make your own quilted mask design - Sarah Kirsten

5) Cut out the pieces, seam allowances included. Lay them out in the arrangement they will be sewn.

How to Make Your Own Quilted Mask Design - Tutorial with tons of photos

6) To true up the seams, take the top piece and fold the paper along the seam allowance line. Trim off the tips of the seam allowance so the edges match the edges it’s folded against.

How to Make Your Own Quilted Mask Design - Tutorial with tons of photos
How to make your own quilted mask design - Sarah Kirsten

7) To true up the next piece, lay the first piece on top of the second piece as if you were sewing them together. Trim off the tips of the second piece so the edges of the first piece and second piece match.

How to Make Your Own Quilted Mask Design - Tutorial with tons of photos

8) Follow the same steps to true up the seams of all the pieces. Label the pieces with how many pieces of fabric to cut of each.

How to Make Your Own Quilted Mask Design - Tutorial with tons of photos

That’s it! Good work. You’ve just made your own quilted mask pattern.

To get some tips on how to sew your mask together, check out the Melon Mask Sew Along.

Here’s how the mask design from this tutorial turned out.

How to Make Your Own Quilted Mask Design - Tutorial with tons of photos

If you don’t want to make your own mask design, you can grab my quilted mask pattern here!

Melon Mask Sew Along

The Melon Mask is here to bring you some joy. Here’s a photo version of how to sew it.

Get your Melon Mask here!

Let’s jump in…

1) Pick out your favorite colors. If you want a coloring sheet to help plan colors, download the PDF here.

Melon Mask Sew Along - Sarah Kirsten

2) Cut out all the pieces. Lay the front pieces out in the arrangement you want them on the finished mask.

Melon Mask Sew Along - Sarah Kirsten

We’ll start by sewing the right side of the mask together first.

3) Sew the two right center pieces with right sides together. 3/8” (1 cm) seam allowance.

Melon Mask Sew Along - Sarah Kirsten

4) Sew on the top right nose piece with right sides together. 3/8” (1 cm) seam allowance.

Be sure to move the seam allowance of the center pieces out of the way so they don’t get caught in the stitching.

Melon Mask Sew Along - Sarah Kirsten

5) Sew on the bottom right nose piece with right sides together. 3/8” (1 cm) seam allowance.

Be sure to move the seam allowance of the center pieces out of the way again so they don’t get stitched through.

Melon Mask Sew Along - Sarah Kirsten

Take a moment to admire how lovely it’s coming together.

Melon Mask Sew Along - Sarah Kirsten

6) Repeat steps to sew the left side of the mask together.

Melon Mask Sew Along - Sarah Kirsten

7) Trim seam allowances in half. Press seams open with a steamy iron.

Melon Mask Sew Along - Sarah Kirsten

8) Sew right and left sides of the mask with right sides together. 3/8” (1 cm) seam allowance.

Be extra mindful here of matching up the center seams!

Melon Mask Sew Along - Sarah Kirsten

9) Trim seam allowance in half. Clip into seam allowance along the curve. Press seam open.

Melon Mask Sew Along - Sarah Kirsten

10) Sew back pieces with right sides together. 3/8” (1 cm) seam allowance.

Melon Mask Sew Along - Sarah Kirsten

11) Trim seam allowance in half. Clip into seam allowance along the curve. Press seam open.

Melon Mask Sew Along - Sarah Kirsten

12) Place the front and back with right sides together. The front should be slightly larger than the back.

_U5A0049.jpg

13) Sew along the top and bottom edge. 3/8” (1 cm) seam allowance.

Melon Mask Sew Along - Sarah Kirsten

14) Clip into seam allowances along the curve.

Melon Mask Sew Along - Sarah Kirsten

15) Turn mask right side out. Press edges with steam iron.

Melon Mask Sew Along - Sarah Kirsten

16) Fold the ends in 3/8'“ (1 cm). Press with steamy iron.

Melon Mask Sew Along - Sarah Kirsten

17) Pin one end of elastic 1/2” (1.3 cm) deep on one side of the mask. Try it on and determine what length is right for your ears (plus the seam allowance!). Cut two pieces of elastic that length.

_U5A0068.jpg

18) Stick the ends of the elastic in 1/2” (1.3 cm) deep. Sew a 1/4” (0.6 cm) wide rectangle along the edge of the fabric.

Melon Mask Sew Along - Sarah Kirsten

Rejoice! What a good job you’ve done! #SKmelonmask

Melon Mask Sew Along - Sarah Kirsten

If you haven’t grabbed the pattern yet, you can get it here.

Photography - Capturing Black Clothing

Capturing black clothing can be difficult. Maybe you have discovered this if you’ve tried to photograph black handmades before! Here is a tip that can help.

In your photo editor, increase the exposure of just the SHADOWS. Almost every photo editor has an option to increase or decrease shadows. So whichever one you use, it probably has this option.

Photography tips - Sarah Kirsten
_U5A3048.jpg
Photography tips - Sarah Kirsten

These pants are the Dawn Jeans and the Philippa Pants. Two wonderful patterns from wonderful designers.

Denim is from Cloth Story.

Photography - Capturing White Things

Capturing white can be challenging. Here’s what I’ve learned — set the exposure low. It’s much easier to increase exposure in editing then it is to decrease exposure while maintaining details of the photograph. So err on the underexposure side.

Set the exposure so it under exposes the white thing you want to focus on in the photo. In the first two photos I wanted to focus on the white dress. The second two photos I wanted to focus on the room itself.

Photography tips - Sarah Kirsten

You Are Doing Enough

You Are Doing Enough - Sarah Kirsten

Do you ever feel pressure to turn your sewing into something other than just a joyful hobby? A lot of us fall into that trap.

Here is an excerpt from an article in a series I am writing on The Thread, a blog by the Fabrics-store.com.

If you love sewing, I want to encourage you to not fall into the pressure of thinking it has to have some purpose other than that it brings you joy, and it brings you clothes you love. Using your talent and enjoying it is perhaps all you need to do to fulfill your purpose and bring joy to that which created you.

You have permission to just sew because you love it and it’s fun.

Click here to read the full article.

"I only sold one copy"

Blog - Sarah Kirsten

This summer I discovered a new-to-me music artist that I’ve been enjoying a lot. His name is Jonathan Ogden.

In an interview, he shared that when he came out with his second album he only sold one copy.

He said he wasn’t doing it to make money but because he loved producing music.

Now he makes his living through his music.

It’s amazing to hear stories of where people start.

If you’re starting a new project, don’t be discouraged. Everything starts small. Champions don’t start by being successful. Success is the end result, not the first step.

Blog - Sarah Kirsten

Wearing my memade swimsuit and swimming in this soft linen before I cut it into a dress.

Blog Series on The Thread - Embrace Your Measurements

Embrace Your Measurements - Sarah Kirsten

There is something beautiful about stripping back layers and taking a look at something in its rawness. In this article on my series on the power of sewing on The Thread Blog, I tell the story about disobeying my parents and trying to grow dreadlocks while they were on vacation, and then shaving my head 10 years later.

This article is all about when we are willing to look at things in the rawness and to get to know them, our appreciation and love grows. That’s the power of getting to know our own bodies, the power of sewing for them.

Here’s an excerpt:

You get to fall in love with yourself. You scrape off old paint (clothes that don’t fit you perfectly) to discover the unmatched beauty of the natural wood underneath. That’s who you are – you are unmatched beauty.

Click here to read the rest of the article.

Going Through It

Going Through Struggle - Sarah Kirsten

When things are rough, you have to rest in the goodness of God.

“Every breath we breathe an invitation to believe you are creating something good.”

Listening to this song is like putting vaseline on a wound. I’ll Give Thanks by Housefires.

MARK5584.jpg
Going Through Struggle - Sarah Kirsten

As much as I love talking about the bright side of life, all of life isn’t lived in the sunshine. In fact, some of the most important things happen in the dark valleys. If I may be vulnerable for a moment, over the last year, there have been some patches of brier bushes and valleys along my personal path (also some of the most meaningful, beautiful, life defining stretches of path). I’ve learned that every challenge and hurt is a joy to go through because it’s an opportunity to grow deeper and to be molded into exactly who you are supposed to be. But it’s still uncomfortable and, well, it’s painful and hard.

I’m holding on to the promise of God’s goodness in this season. Resting in it. If you’ve had some brier patches and dark valleys in your last year too, I invite you into resting in the childlike, illogical trust of this goodness with me.

Blog Series on The Thread - It's Time to Recognize the Untruths You've Believed About Your Body

The Thread Blog - Sarah Kirsten

The last few months I’ve had the honor of having a column on The Thread — the fascinating and inspiring blog by Fabrics-Store where I talk about the power of sewing.

Here is an excerpt from my latest article…

For some reason or another, our body seems to be of particular interest for attack from mean voices within. The mean voice is surprisingly convincing. It starts early in our lives. It is not invited inside, but it finds a way in. It cleverly twists things you hear or experience into unhealthy comparisons with girls around you. Because it starts so young and because it’s so constant, you become accustomed to the voice. It feeds you lies, but you start to perceive them as truths.

Click here to read the rest of the article on The Thread.

Sewing the Cedar Sweater by Sew North

Oh what a joy to sew the Cedar Sweater pattern by Mia of Sew North.

I wear a lot of sweatshirts but this is the first one I made. It was outside of my comfort zone a little bit, working with stretchy knit instead of the thick wovens I’m used to. But Mia made the whole process easy. Easy to follow, thorough instructions and her simple design options.

Whenever I sew a pattern I feel like I’m spending time with the pattern maker. It was a joy to “spend time” with Mia while making this color blocked Cedar Sweater.

Mia blogs, has amazing sewing content, and this sweater pattern here: www.sewnorthco.com

Mia has a beautiful Instagram account here: @sewnorth