How to Install Side Release Buckles and Slide Adjusters

Tutorial How to Install Side Release Buckles and Slide Adjusters - Sarah Kirsten

This post is to complement pattern instructions for the Fennel Fanny Pack. The techniques apply to all Slide Adjusters and Side Release Buckles however.

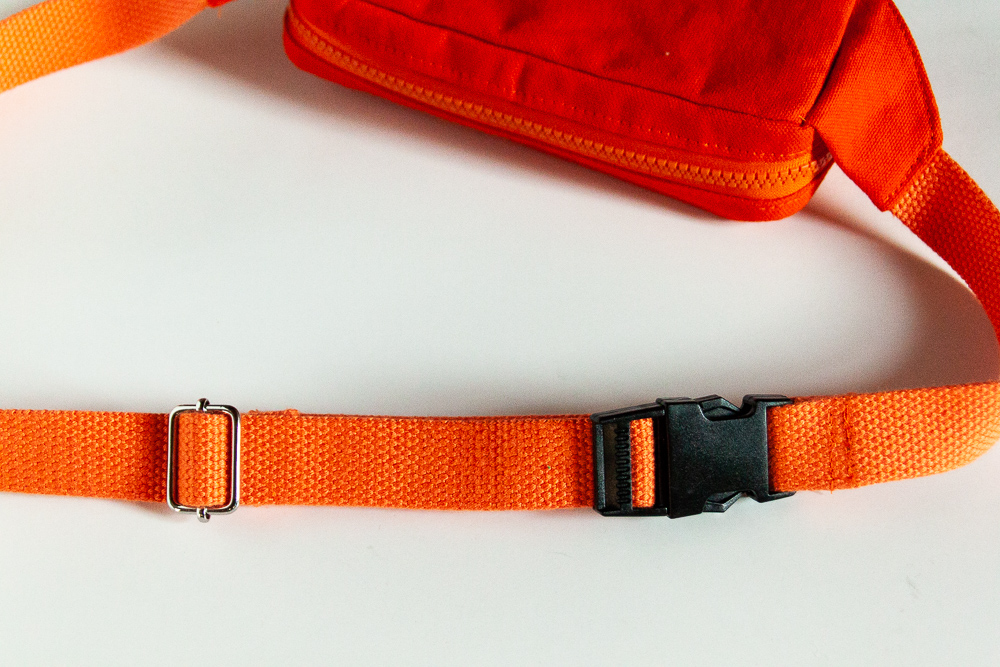
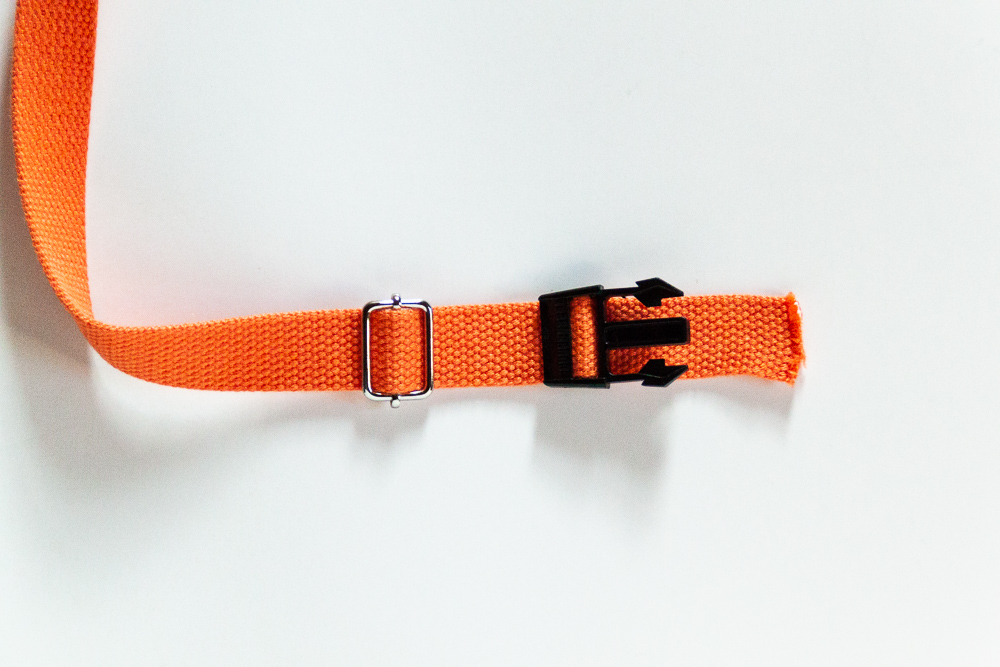
Step 1: Install the Slide Adjuster on the long end of the webbing.

Tutorial How to Install Side Release Buckles and Slide Adjusters - Sarah Kirsten

Step 2: Install the male end of the Side Release Buckle by feeding the webbing up and around the center bar of the buckle.

Tutorial How to Install Side Release Buckles and Slide Adjusters - Sarah Kirsten

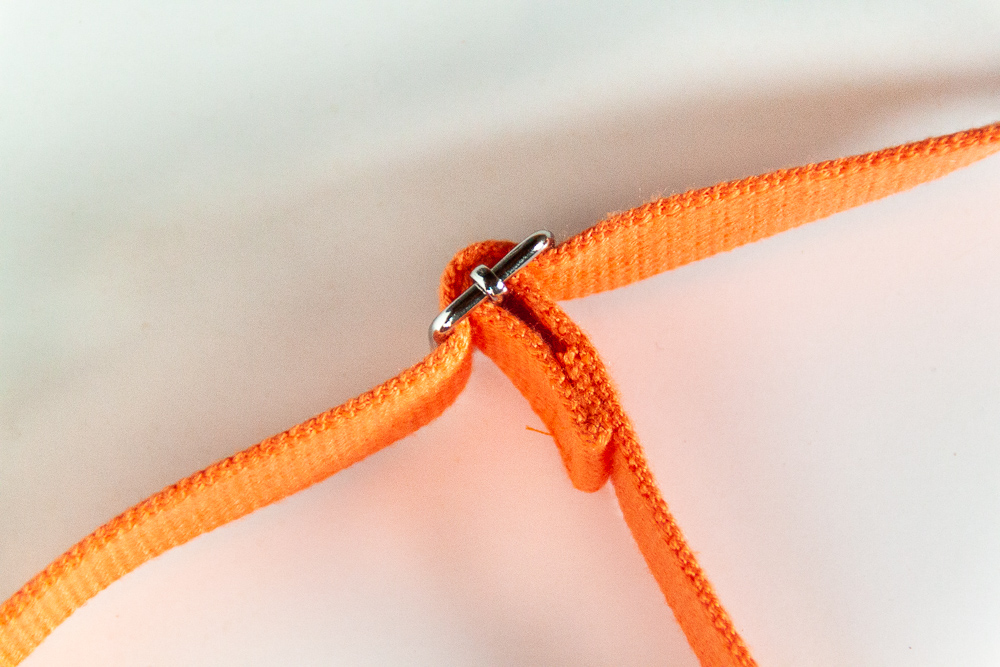
Step 3: Feed the webbing back through the Slide Adjuster, the same direction as the first time, underneath the existing webbing.

_MG_0594.jpg
Tutorial How to Install Side Release Buckles and Slide Adjusters - Sarah Kirsten

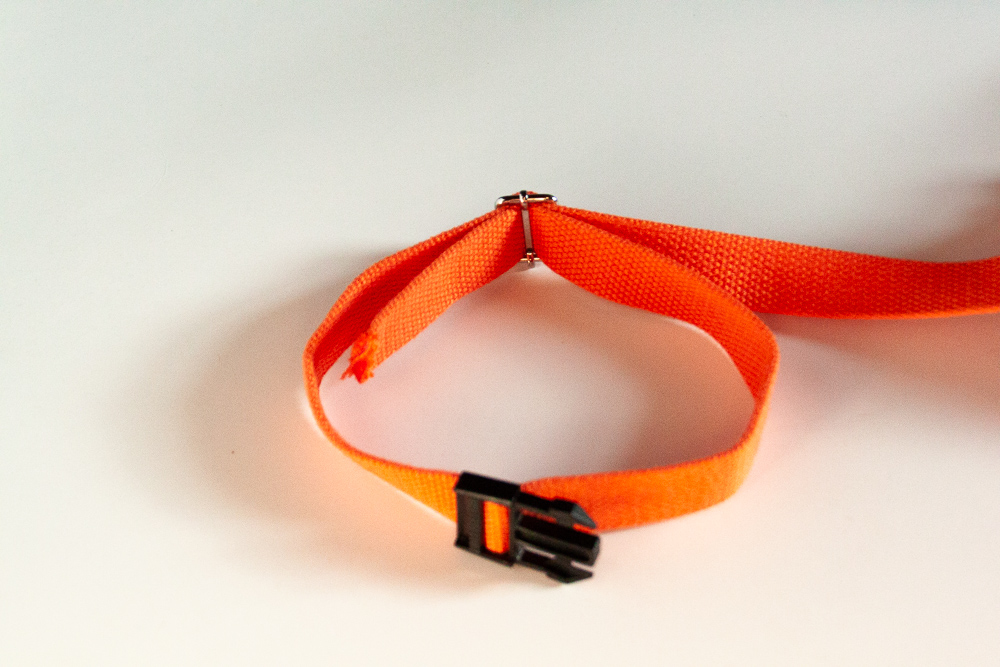
Step 4: Loop the webbing around the center bar of the Slide Adjuster. Fold the end in 1/2 in | 1.3 cm and sew the webbing to itself with two rows of stitching.

Tutorial How to Install Side Release Buckles and Slide Adjusters (with lots of photos!) - Sarah Kirsten
Tutorial (with lots of photos) - How to Install Side Release Buckles and Slide Adjusters - Sarah Kirsten

It should look something like this:

Tutorial How to Install Side Release Buckles and Slide Adjusters - Sarah Kirsten

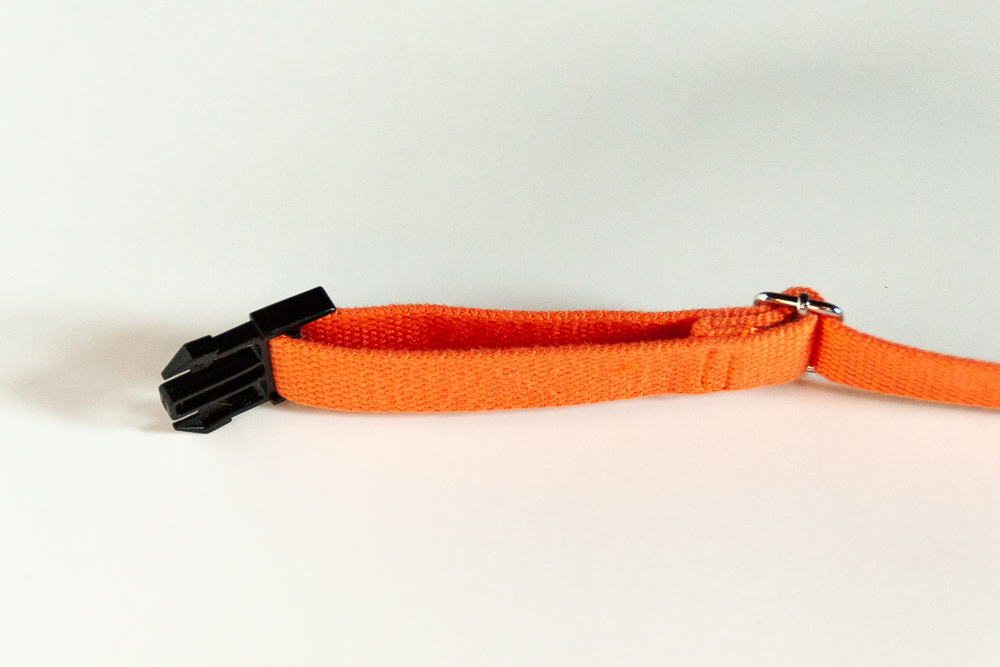
Step 5: Insert the short side of the webbing into the female end of the Side Release Buckle. Fold the end of the webbing in 1/2 in | 1.3 cm and sew with two lines of stitching.

Tutorial How to Install Side Release Buckles and Slide Adjusters - Sarah Kirsten

Finding Thrifted Fabric

The linens section at secondhand shops are positive goldmines. Old tablecloths and curtains have such good texture, and you can’t beat the price for the yardage! Here are some recent finds from my local thrift shops. If I remember correctly, all of these were purchased for less than $3.00.

Thrifting fabric, secondhand fabric - Sarah Kirsten

Many people recommend not buying fabric unless you have a specific project in mind. I, on the other hand, think it’s a good idea to buy fabric with no project in mind. Fabric is a special thing. If you find something you love at a good price, don’t let it slip away. For many of us sewing is our main creative outlet. Having fabrics of various materials and sizes and colors on hand to play with is so important in our lives.

I love the freedom of checking my stash and picking out the right fabric for an idea the same hour it forms in my head. I love being able to play and experiment without driving to the store and waiting for new fabric to wash and dry. Our time is so limited — I want the time I dedicate to playfulness in my sewing room to be as productive as possible.

So, I believe in big stashes.

_MG_0439-2.jpg

Flannel Jumpsuit - Peppermint Mag & In the Folds Free Jumpsuit Pattern

Last winter there was a noticeable gap in my wardrobe. The house gets quite chilly in the cold months, especially in my sewing room, and I needed something warm to wear on those difficult days with… ahm…. cramps.

I wanted something that would keep my legs warm without putting any pressure on my tummy, so I printed out this free jumpsuit pattern by In the Folds for Peppermint Mag. In retrospect I didn’t need it quite this baggy and should have made a smaller size, but I think it’s bagginess is kind of endearing and it’s so comfortable.

To make it extra warm and cozy I sewed it in flannel (can you ever have too much flannel in your wardrobe?), and I just recently realized that I could pair it with my matching green flannel, self drafted, short sleeved turtle neck I made the winter before last for an even more cozy outfit.

This year I’m ready and armed with warmth for those cold days already on the way. I’m so thankful to have this piece in my wardrobe. It makes me happy having something joyful and soft and warm and cozy to put on.

Peppermint Mag & In the Folds Free Jumpsuit Pattern - Sarah Kirsten

Even though I made this mainly to wear at home, I love the bagginess and color and texture. I think I’ll wear it out and about this fall, too.

Peppermint Mag & In the Folds Free Jumpsuit Pattern - Sarah Kirsten

Notes:

The jumpsuit pattern has an invisible zipper in the back that I omitted. I deepened the V in the back by 1” or so to be sure I could slip it on without the zipper, but since I made a larger size I don’t think that was really necessary. I used French Seams instead of serging… I’m not sure why. I guess I usually prefer French seams.

The green flannel fabric is from Joann stores.

Blue shoes from Nike.

Orange trucker hat from winning the Youth Illinois Corn Husking Contest a few years ago. My favorite hat.

Persephone Pants

After sewing these Persephone Pants the direction of my wardrobe has undergone a shift. It feels as if my wardrobe listened to one of those incredibly insightful self help lectures or books and walked away with a deep new appreciation for a different way of thinking. Making jeans was intimidating until I started. I was quickly swept away in the current of sewing. Anna’s instructions are so easy and fun to follow it’s like a book you can’t put down. You traverse without halt from one step to the next, scarcely noticing the beginning or ending of chapters.

These pants make me want to get rid of nearly all my non-memade clothes and just sew everything from now on. They feel so good. I mean not just physically — it feels so good to put on a pair of jeans that you made yourself. They bring me so much joy. I want all my clothes to bring me this much joy.

Thank you, Anna, for all of your hard work on this pattern. I so appreciate your creation.

Sewing the Persephone Pants - Sarah Kirsten

Notes:

These are a size 0 with an extra 3/8” taken off the center back of the pattern piece. I think next time I’ll make them even a bit smaller so they stay tight as the fabric relaxes with wear. Instead of buttons I used snaps for the fly.

The bright orange fabric is Duck Canvas from Joann stores.

This yellow shirt is a rayon knit from Salvation Army thrift store several years ago.

Blue shoes are Nike (found on clearance!).

How to Sew a Lined Vest - Two Easy Methods

Have you ever wondered how to sew a lined vest without any raw edges showing? Wonder no more! Here are two ways to do it. The first method has open shoulders and the second has the shoulders sewn shut.

The pattern used in this tutorial is a self drafted miniature vest.

I purposely choose fabric for this tutorial that you can easily see the right and wrong sides and differentiate the lining from the outer layer.

Method One: Open Shoulders

Step 1: Cut all the pieces - lining and outer layer.

How to sew a lined vest - Sewing tutorial with tons of photos

Step 2: Sew the shoulders of the outer layers together and the shoulders of the lining layers together with right sides together.

How to sew a lined vest - Sewing tutorial with photos

Step 3: Lay the two layers with right sides together. Press seams open and stitch from the bottom of the front center up around the neck and back down the front center of the other side. (If you look closely in the photo you can see white thread where I’ve stitched!)

How to sew a lined vest - Sewing tutorial with photos
How to sew a lined vest - two methods for sewing a lined vest

Step 4: Stitch around the arm holes on each side. Don’t sew down the sides, just the arm holes.

How to sew a lined vest - Sewing tutorial with photos

Step 5: Clip curves and trim corners.

How to sew a lined vest - easy to understand sewing tutorial

Step 6: Turn the vest right side out through the shoulders.

How to sew a lined vest - easy to understand sewing tutorial

Step 7: Press the seams open and sew up the sides with right sides together. (This part is tricky to explain and photograph clearly, but it makes sence once you get it! Just play around with it a little bit.)

How to sew a lined vest - easy to understand sewing tutorial

Be sure to match up the seams. (This is the side seam right by the arm opening.)

How to sew a lined vest - easy to understand sewing tutorial

Here’s what it looks like with the sides sewn together.

How to sew a lined vest - easy to understand sewing tutorial

Step 8: Now that the side seams are sewn, admire how good your vest is looking so far.

How to sew a lined vest - easy to understand sewing tutorial

Step 9: Turn the vest inside out. Press the seams open and sew the bottom of the vest leaving a few inches open in the back. The thicker the fabric the wider you want to leave the hole for turning the vest right side out.

How to sew a lined vest - easy to understand sewing tutorial

Since turning the vest can put a lot of stress on the stitching, it works well to sew down to the bottom edge of the fabric to add extra stability. It makes for much less stressful turning!

How to sew a lined vest - easy to understand sewing tutorial

Step 10 & 11: Clip the corners. Turn the vest inside out through the opening in the back and hand or machine stitch the opening closed.

How to sew a lined vest - easy to understand sewing tutorial

Give the vest a good press and it’s ready to wear!

Sewing Tutorial - Two methods for sewing a lined vest with tons of photos

Method Two: Closed Shoulders

Step 1: Cut out all the pieces - the lining and the outer layer.

How to sew a lined vest - Sewing tutorial with photos

Step 2: Lay the lining and the outer layers right sides together. Sew around the neck and arm openings on the back pieces. Sew around the arms, neck, and front center of the front pieces.

How to sew a lined vest - Sewing tutorial with photos

Step 3: Clip the curves, trim the corners, and trim the seam allowance at the top of the arm openings and neck by the shoulders.

How to sew a lined vest - Sewing tutorial with photos

Step 4: Turn the front vest pieces right side out.

How to sew a lined vest - Sewing tutorial with photos

Step 5: Put the front vest pieces in between the lining and outer layer of the back piece.

How to sew a lined vest - Sewing tutorial with photos

Step 6: Sew the shoulders closed.

How to sew a lined vest - Sewing tutorial with photos

Step 7: Press seams open and sew the sides of the vest with right sides together.

How to sew a lined vest - Sewing tutorial with photos

Be sure to match up the side seams.

How to sew a lined vest - Sewing tutorial with photos

Here’s what it looks like when the sides are sewn together.

How to sew a lined vest - Sewing tutorial with photos

Step 8: Turn the vest right side out and admire how it’s looking so far.

How to sew a lined vest - Sewing tutorial with photos

Step 9: Turn the vest inside out (one last time), press the seams open and sew the bottom shut leaving a few inches open in the back.

How to sew a lined vest - Sewing tutorial with photos
How to sew a lined vest - sewing tutorial with tons of photos by Sarah Kirsten

Step 10: Trim the corners.

How to sew a lined vest - Sewing tutorial with photos

Step 11: Turn the vest right side out (for the last time) through the opening in the back. Hand or machine stitch the opening shut.

How to sew a lined vest - Sarah Kirsten sewing tutorial with tons of photos

Give the vest a good press and try it on to see how it looks.

How to sew a lined vest - Sewing tutorial with tons of photos by Sarah Kirsten

Discussion notes:

In both of these examples I left the opening to turn the vest right side out on the bottom seam. It’s also a good option to leave the opening in the side seam of the lining instead of in the bottom.

The pattern used in this tutorial was a mini self drafted vest for easy sewing and photographing, but I used the pattern to make this little quilted vest with snaps. I used the open shoulder method for this vest so I could put the batting through the shoulders. I’m quite in love with how it turned out.

How to sew a lined vest - sewing tutorial with tons of photos by Sarah Kirsten

Then I made this full sized quilted vest for myself. For the batting I used wool from my parents’ sheep farm and a really lightweight ripstop nylon for the outer shell. I again used the open shoulder method to get batting up through the shoulders.

How to sew a lined vest - sewing tutorial with tons of photos by Sarah Kirsten