I’m excited to announce another limited edition release of a really cool sewing tool! This time… it’s a Spool Stand created in collaboration with my friend, Nate.
Nate is a structural engineer with a natural knack for being good at designing things. He is also sewist, cyclist (he designed and sewed his own set of cycle touring bags), photographer, pickleball player, and a woodworker. He has an adorable shock of salt and pepper curly hair toppled on his head most days. My siblings and I met him through a mutual friend about 10 years ago. Now we go on lots of bike rides, eat lots of ice cream cones, and occasionally attempt triathlons together.

Nate says, “The idea for this spool stand developed while working on a project that required upholstery thread. Instead of going through many 150-yard spools I decided to make the jump to 1500-yard spools, which are only a few dollars more than the smaller spools. I didn’t have a spool stand, and after looking around I realized I could make my own out of scraps in my garage. I was able to combine two of my hobbies, woodworking and sewing.”
When I saw the spool stand he made for himself, I was so impressed and asked if we could do a collaboration to produce a limited edition run. We batted around a few design tweaks, and what he developed for the final product is so beautiful.
My favorite part of the Spool Stand is it’s designed to hold together without glue or nails! It just uses wooden pieces fitted together like tightly secured puzzle pieces. And it’s really strong! There’s no way to take it apart once it’s fitted — it’s all stuck together really solidly. We’ll explain how in the photos below.
Nate invited me to his woodwork shop to see the process of making the Spool Stands. I took my camera with, and Nate explained every step in the process as I snapped photos.

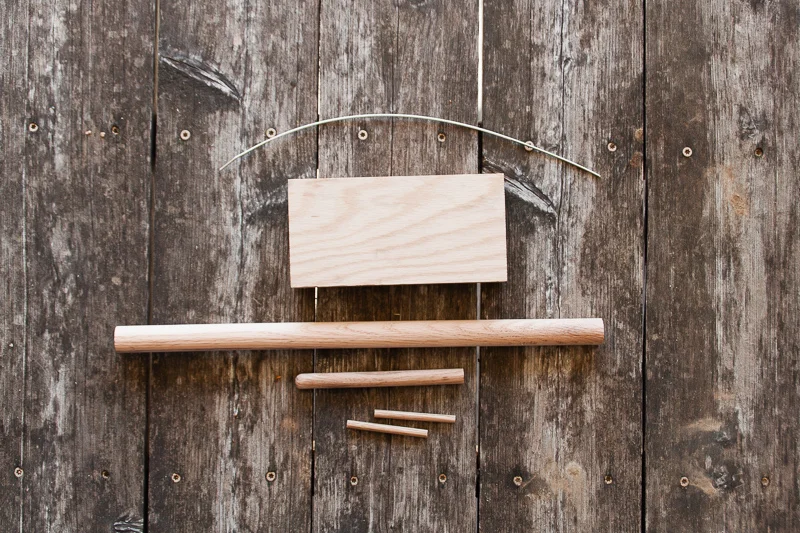
“To make them I start by cutting up oak boards into 7-inch lengths for a base. Then I cut up oak dowels into lengths for the thread guide, smaller oak dowels into short lengths for the spool holder, and even smaller oak dowels into 2.5-inch lengths for dowel pins. Oak hardwood looks really nice, has good durability, and is also easily sourced at my local lumber store, so it was a good choice for this project.”
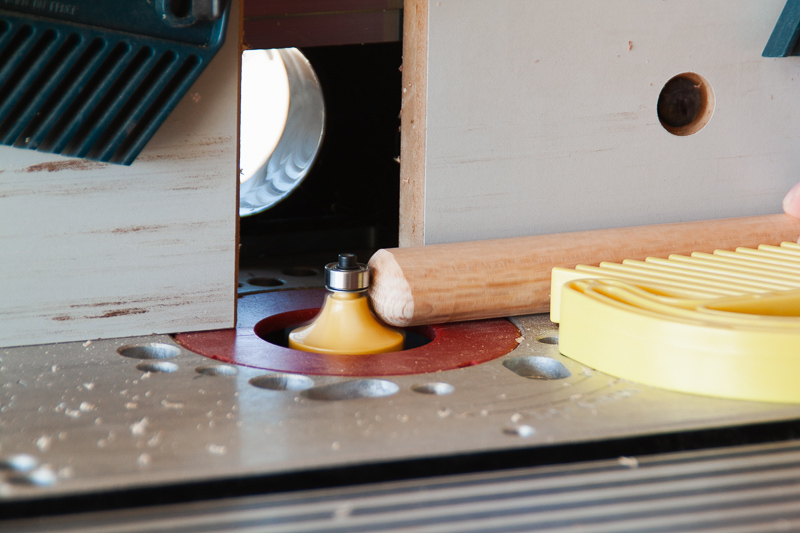


“Next, I round one end of the dowels by using a roundover bit in my router table and drill two holes where the thread guide wire is going to go (inserted in one of the last steps). Then I lightly sand down the dowels to make sure they are smooth after drilling and rounding.”


“Next, I mark the center locations on the base where all the dowels are going to go. Using a slightly undersized bit for hole for the larger dowel and a right-size drill bit for the smaller dowel that acts as the spool holder, I use my drill press to neatly drill all the holes.”


“Using a rubber mallet to not dent or damage the dowels, I pound the dowels into their place on the base.”


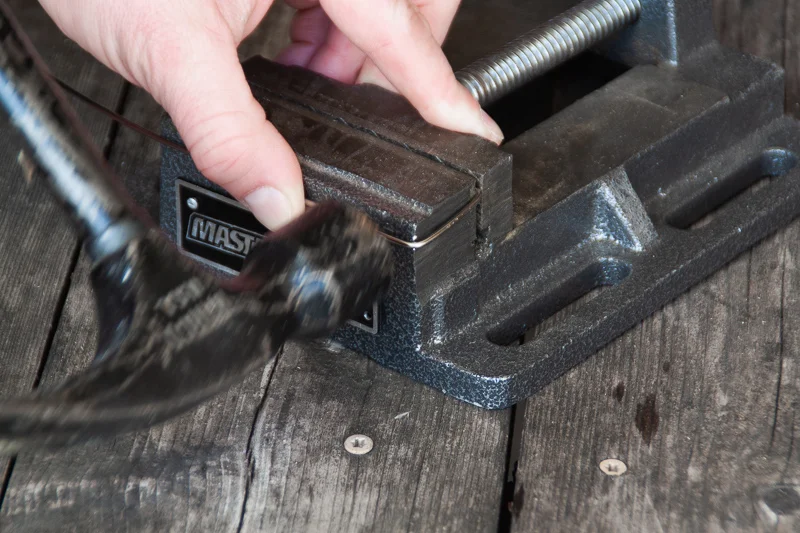
“Then [this is the cool part] I drill holes into the side of the base through the two dowels and pound the smallest dowel pins into these holes. Now all the dowels are prevented from rotating or being pulled out of the base. This allows for a design that doesn’t need any glue, screws, or nails.”
Pretty cool, right?!


“After sanding and cleaning off the dust, I wipe the Spool Stand down with a Danish oil using a clean rag (I use a scrap of a t-shirt I have from making a t-shirt quilt). The Danish oil is a wood stain and sealer in one. It’s easy to apply, provides protection to the wood, and enhances the look. It’s fun to use a natural finish that slightly darkens the wood and brings out the personality of the woodgrain — this is where the unique characteristics of each Spool Stand really stands out.”


“Finally, I cut and bend some stainless-steel wire and install it through the holes I drilled previously in the larger dowel. The two 90-degree bends at the back of the dowel prevent the wire from rotating in the dowel. This wire material and size is perfect for this Spool Stand because of its ability to be shaped without kinking, its strength and durability, and its adjustability.”
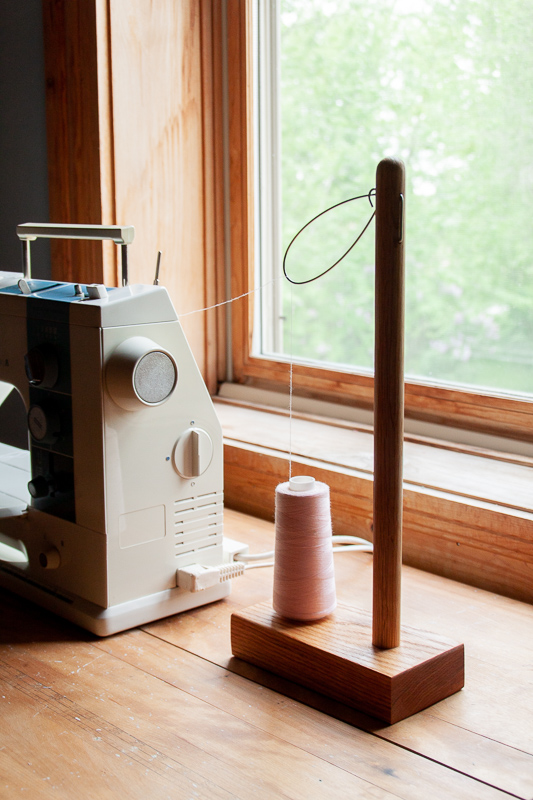

And just like that, you have a beautiful spool stand that enables you to seamlessly (no pun intended haha) use larger spools of thread on your regular sewing machine!
I’m really excited to be releasing a very limited amount of these special handmade Spool Stands along with the Chamomile Crop on September 7th! They are sitting in my sewing room right now, waiting to be shipped out to their new homes. These are such beautiful pieces of workmanship and design. It’s a good piece of equipment to have in your sewing arsenal. I feel honored to have one sitting on my sewing table and to be able to provide a limited number to my customers!


