Wearing Yoke Handmade

Hemp shirt from Yoke Handmade - Sarah Kirsten

Since clearing out my closet a few months ago (I wrote a post about that experience here), I’ve been more conscious of the clothing I bring into my wardrobe. One of the most recent pieces I’ve added is this Silver Dollar Top by Yoke Handmade. This is a special shirt for me to own because I’ve been following the owner, Kellen, since she started working on the designs for Yoke Handmade. It was fun to see parts of her drafting process, and now to hold and touch and wear one of her pieces.

Yoke Handmade - Organic Hemp Top
Yoke Handmade - Organic hemp shirts

Each piece is beautifully sewn in her home studio with tiny French seams and neatly pressed hems. It’s made out of lovely 100% organic hemp. The way the light filters through the ivory fibers, illuminating the delicate weave, it’s quite captivating.

Hemp shirt from Yoke Handmade - Sarah Kirsten
Yoke Handmade - Organic hemp shirts

What I love about this top is it can be dressed up or down (which is so good if you’re trying to keep a small wardrobe!) I’ve been wearing a lot of athletic clothes lately (hello joining the gym!). It pairs both with my high waisted running shorts and leggings and my high waisted nice jeans.

This is one of the few pieces of clothing I have in my wardrobe that I got brand new and didn’t sew myself. it’s a treat to have in my closet.

Hemp shirt from Yoke Handmade - Sarah Kirsten

Website: yokehandmade.com

Instagram @yokehandmade

Interviewed by Aningri.com

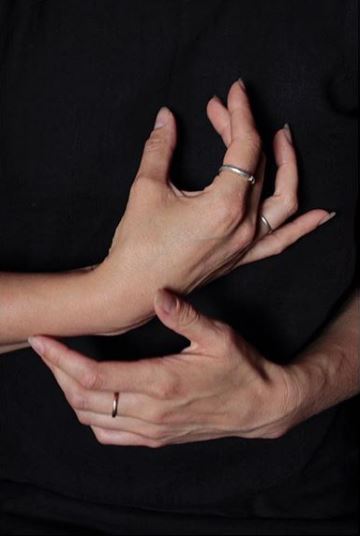
A few months ago, the jewelry designer Aningri (who also happens to be my sister) reached out and asked if I would like to do an interview with her. I, of course, said yes with enthusiasm. I have been an owner of an Aningri Work Ring since she first launched her company last summer. It’s the only piece of jewelry I wear on a regular basis. So naturally, I was thrilled when she asked me for an interview.

Here’s an excerpt:

How did you get to where you are now in your work?

It took me a long time to get to a place emotionally where I was willing to sell my patterns. Drafting has always been natural to me. Visualization of shapes and sizes angles and the interfaces of 3D objects has always made sense in my head, so I didn’t realize for a long time that it doesn’t come naturally to everyone. And then there was the whole thing of feeling strange because I realized I had a talent that others didn’t and figuring out how to deal with that was difficult. I finally came to a place where I realized that in order to fully embrace who I am I need to fully embrace my talents. Along with that I’ve realized that walking fully in our talents is the best way we can serve others.

What is the value of being yourself in your work?

I think when you're in any field, but especially in design, it's so important to remember that no one else can create something exactly like you can. Even if you have similar design ideas to someone else, the way you construct the design is different. You bring uniqueness simply because you are a unique being. I think the more we are willing to be in touch with our uniqueness the more of ourselves shows up in our work, and the more valuable our work becomes. Ultimately realizing that we are talented, we have things to bring to the table, we are unique -- that's the value of being myself in my work.

To read the full interview, click here.

If you’re in the market for a simple, beautiful, low profile ring that doesn’t get snagged on fabric or in the way of your other making, check out Aningri’s Work Ring. I’m so happy I own one. Thank you, Anna, for having me in your interview series and for making such beautiful jewelry that makes me feel like me.

Website: Aningri.com

Instagram: @_aningri

Aningri Work Ring - Sarah Kirsten

Shipping Physical Products

It was my first time shipping out a physical product, the Black Walnut Point Turners (which sold out 2 hours after officially putting them up for sale - Thank you to everyone who expressed interest and made a purchase!). I wasn’t sure how the packaging would go at first, but I quickly realized it was a whole new opportunity to hone and define my brand and decide what my brand embodies in a physical way. Until this point it has only embodied a digital, visual presence. The experience kind of took me aback. I really didn’t know what my brand looked like in physical form. I’m still not sure, but it’s fun to be on the discovery process.

Beautiful Packaging of Physical Products - Sarah Kirsten

I can’t say I have it all figured out yet, but I can say confidently that I’m figuring it out and learning some things on the way. I set my sewing machine on the floor, cleared off my little seamstress table, and gathered up some string, tissue paper, linen fabric scraps, nice paper for handwritten notes, my favorite brown paper envelopes, and set to work.

Beautiful Packaging of Physical Products - Sarah Kirsten

Before too long I had a big bundle of packages ready to be taken to the post office. Well, actually, being honest, this took me a series of several days from conception of the packaging materials and methods to finally visiting the post office (and holding up the line for 20 minutes while each package was posted. Next time I think I’ll try a home shipping service… ).

Beautiful Packaging of Physical Products - Sarah Kirsten
Beautiful Packaging for Physical Products - Sarah Kirsten

This was sort of a test to see how physical products would sell, and how much I enjoyed shipping them. I think it’s always good to have multiple avenues of income as an entrepreneur. This ended up being quite fun, so I’m excited at the possibility of selling more physical products in the future.

They're Here! Handmade Black Walnut Point Turners

They are HERE! I just added a limited quantity of Black Walnut Point Turners to my shop. (See previous post for details and photos of how I made them.)

Click here to shop Black Walnut Point Turners

Point turners are really useful for making corners crisp and sharp after sewing something with a corner or point and turning the fabric right side out. The sharp end of the turner effectively and efficiently forces the stubborn fabric of the seam allowance up against the stitching of the seam and causes the corner to expand to it’s full and intended potential.

In previous years I’ve used pens and accidentally left ink marks on the fabric, pencils with broken tips that never quite got the corner as crisp as I wanted, and the tips of scissors and accidentally cut through the fabric. All horror stories!

Point turners are an excellent addition to your set of sewing tools to keep handy by your sewing machine. Each one is unique and has slightly different color and size variation. If you’d like to grab one for your sewing table, grab one quick! Half of them pre sold before I even posted them for sale!

SHOP Black Walnut Point Turners

Handmade Wooden Point Turners

Handmade Wooden Point Turners for Sewing - Sarah Kirsten

Isn’t it lovely to surround yourself with handmade things? They feel so special to hold and to use. They have so much more character than store bought items. To that end, I’ve been wanting a point turner for awhile but didn’t want to buy any of the ones I found at local stores.

Rummaging around a stack of salvage lumber in our workroom, I found this beautiful piece of black walnut wood. I asked my parents where it came from and they said they rescued several pieces when a school was disposing of an old piano several years ago. I’m not sure what happened to the rest of the piano, but this wood is just beautiful.

After making myself a point turner, there was enough board left over to make a few more! I’m offering the limited number for sale in the next few days. In the meantime, here’s a photo summary of how I made them.

Handmade Wooden Point Turners - Sarah Kirsten
Handmade Wooden Point Turners for Sewing - Sarah Kirsten

I used a bandsaw for all the steps above and used a table sander to round all the edges and to carve the tip down to a sharp(ish) point on both the front and back. Having a sharp point is helpful to push out stubborn corners effectively.

Handmade Wooden Point Turners for Sewing - Sarah Kirsten

There is a very limited quantity of these available if you are interested in snagging one for your sewing table! If you would like to be notified immediately when they are available (verrrry soon! Like, tomorrow!), feel free to sign up for my mailing list!

Handmade Wooden Point Turners for Sewing - Sarah Kirsten

The Easiest Way to Sew Zipper Ends

Whether you are using a cut-to-length zipper (my personal favorite) or a regular zipper, the need sometimes arises to sew a nice fabric patch on the end of the zipper. Of all the ways to do this (most are terribly frustrating), this is the best method I’ve used. It’s reliable - works every time. It’s quick - only takes about a minute total. It looks neat - no raw edges which makes it good for a variety of applications. And best of all, it’s the least fussy - it’s easy to get the fabric lined up and sewn straightly.

Here’s how to do it.

1) Cut a rectangle of fabric about 4” (10 cm) long and 1/2” (1.3 cm) wider than the width of the zipper.

The easiest way to sew zipper ends - Tutorial by Sarah Kirsten

2) Fold the rectangle in half with right sides together. Sew both sides with a 1/4” (0.64 cm) seam allowance.

The easiest way to sew zipper ends - Tutorial by Sarah Kirsten

3) Turn the fabric right side out.

_MG_0765.jpg

4) Fold the top inside the little pouch so that the top of the fabric reaches all the way to the bottom.

The easiest way to sew zipper ends - Tutorial by Sarah Kirsten

5) Make sure the folded edge of the pouch is even all the way around. Insert the zipper inside. (Note: Depending on the application you’re using it for and the type of zipper, you may want to remove some zipper teeth so you don’t sew over them.)

The easiest way to sew zipper ends - Tutorial by Sarah Kirsten

6) Stitch near the top of the pouch through all layers.

The easiest way to sew zipper ends - Tutorial by Sarah Kirsten

That’s it! You’re done.

In my free Pear Pouch Pattern I use a different method, but this would be an excellent alternative. In fact, this is, simply put, a better method. More reliable and less fussy all around.

Getting My Closet Down to 106 Pieces

The joys of a small wardrobe - Getting my closet down to 106 pieces - Sarah Kirsten

I recently ran across an infographic on Pinterest. A woman started with 450 items in her closet and pruned it down to 65. It got me thinking… what’s in my closet?

I counted, it was about 200.

It would be a stretch for me to get down to 65 pieces. I need clothes for Iowa summers, winters, springs & falls (if you’re not familiar with Iowa weather, it ranges from humid and hot to bitter cold), clothes for farm work (I live on a sheep farm), clothes for outdoor activities (kayaking, climbing, cycling, running, swimming, hiking, camping, etc), nice clothes for going out and about, clothes for staying home and being cozy. It feels like a lot of targets to hit. Many of the categories overlap though. The clothes I like to take on cycling or climbing trips are similar to what I wear on normal summer days, for example.

With the goal of getting my closet number as low as I could stand, I pulled out clothes:

  • I don’t actually like

  • I feel obligated to keep

  • I like and hope to wear someday but never do

  • I used to like but don’t wear anymore

  • I don’t feel happy wearing or looking at on my shelves.

I was able to purge around 90 pieces and get my wardrobe down to 106.

The benefits of pruning my closet down to 106 pieces - Sarah Kirsten

So, what’s in my closet?

I’ve divided my wardrobe into categories of uses. These are:

Everyday - wearing around the house.

Workout - gym, etc.

Adventure - cycling trips, climbing, kayaking, hiking, etc.

Farm - farm work and daily chores (and other messy things like painting, etc).

Nice - going out with friends, on trips, going out for tea or errands, etc.

Here’s what’s in my closet:

  • 8 shorts - everyday / workout / adventure / farm / nice

  • 11 pants - everyday / workout / adventure / farm / nice

  • 7 long sleeve tops - everyday / workout / adventure / farm

  • 11 short sleeve tops - everyday / farm / nice

  • 7 tank tops - everyday / workout / farm / nice

  • 12 button up shirts / jackets - everyday / adventure / farm / nice

  • 1 vest - nice

  • 9 sweaters - everyday / farm / workout / adventure / nice

  • 3 wind breakers - workout

  • 2 rain jackets - nice

  • 2 winter coats - everyday / nice

  • 19 dresses - everyday / nice

  • 8 skirts - everyday / nice

  • 6 jumpers - everyday

Getting my closet down to 106 pieces - Sarah Kirsten

Insights

I’m so glad did this because it give me some valuable insights into my wardrobe. I will quickly outline them here:

1) It helped me realize what I need to work on sewing/adding to build a strong, well rounded closet. I need more nice jeans, more gym clothes.

2) My room is a happier place and I’m a happier person without things I don’t actually like sitting on my shelves.

3) Getting dressed in the morning takes less time and is more (way more) fun.

4) Only 7 pieces in my closet are things I bought new. The rest are sewn, thrifted, or secondhand from family and some friends. I don’t know if that’s good or bad but it’s just interesting!

5) I would like to transition my closet to almost all memade items. It just feels nice to surround yourself with good quality clothes that are made by you.

6) Much of my summer wardrobe is memade and most of my winter wardrobe is not. It would be nice to even the balance.

7) Since I work from home, I tend to not wear my nice clothes around the house in case I want to wear them out in the evenings or weekends. I want to keep them fresh so I have options. My epiphany while cleaning was if I just MADE myself more nice things (if I had more than 2 pairs of nice jeans) then I could wear nice clothes around the house AND have nice clothes to wear out and about. Revolutionary.

8) Echoing #7, I’m happier when I wear nice clothes around the house. They make me feel good.


With some practice I think I can get my wardrobe number even lower. I already feel myself being more willing to give things up after experiencing a taste of the joy of only having what you really love. I’m so happy I cleared out my closet!

PS - I wasn’t exactly sure where to draw the line on the numbers, so I want to just mention that I also have 6 swimming suits (I do wear them all…), snow pants and jacket for winter sports, 5 pieces for cycling - shorts, jersey, winter leggings, rain jacket, and rain pants —-and lastly some insulated winter overalls and a coat both used for farm chores.

How to Repair Work Gloves with Holes in the Fingers

How to repair work gloves with holes in the fingers. Tutorial with lots of photos - Sarah Kirsten

Three winters ago my mom bought me a new pair of leather gloves for the daily farm chores. They have been my best pair yet, but unfortunately they are already full of holes in almost all the finger tips. I think mine are a little beyond the repair stage (practically speaking). It’s an on-going problem — farm gloves that wear out too quickly.

Our neighbor said he has the same problem with his farm gloves and sent me this video of how to repair them. The video made it look so simple that I wanted to try it out. I asked if I could repair his gloves. It turns out it IS really simple and surprisingly easy. Here’s how to do it.

How to repair work gloves with holes in the fingers. Tutorial with lots of photos - Sarah Kirsten

1) Turn the gloves inside out and seam rip around the panel containing the hole.

How to repair work gloves with holes in the fingers. Tutorial with lots of photos - Sarah Kirsten

2) Cut out the piece with the hole.

How to repair work gloves with holes in the fingers. Tutorial with lots of photos - Sarah Kirsten

3) Using the piece with a hole as a pattern, cut out a new piece of leather (or fabric). Make the new piece 1/4” - 3/8” | 0.64 - 1 cm longer than the piece you cut out from the glove.

How to repair work gloves with holes in the fingers. Tutorial with lots of photos - Sarah Kirsten

4) Overlap the new piece with the existing finger panel and zigzag stitch them together along both edges (the edge of the new piece and the edge of the existing piece).

How to repair work gloves with holes in the fingers. Tutorial with lots of photos - Sarah Kirsten

5) Starting from the top of the finger, sew down each side. Stitch over the whole thing 2 - 3 times to reinforce the stitching.

How to repair work gloves with holes in the fingers. Tutorial with lots of photos - Sarah Kirsten

7) Turn the glove right side out and admire the new finger!

How to repair work gloves with holes in the fingers. Tutorial with lots of photos - Sarah Kirsten

- Alternative Method -

On the thumb I tried a different method, and I ended up liking it more. Instead of cutting out the old piece just add a new piece on the outside and sew it back up!

1) Seam rip around the panel containing the hole (or in this case, the soon-to-be-hole) and cut a matching piece of leather that extends past the holey area.

How to repair work gloves with holes in the fingers. Tutorial with lots of photos - Sarah Kirsten

2) Zigzag stitch the bottom of the new piece to the outside of the existing piece.

How to repair work gloves with holes in the fingers. Tutorial with lots of photos - Sarah Kirsten

3) Starting from the top of the finger, sew down each side. Stitch over the whole thing 2 - 3 times to reinforce the stitching.

How to repair work gloves with holes in the fingers. Tutorial with lots of photos - Sarah Kirsten

4) Turn the glove right side out and you’re done!

How to repair work gloves with holes in the fingers. Tutorial with lots of photos - Sarah Kirsten

Ready for another cold winter on the farm :)

How to repair work gloves with holes in the fingers. Tutorial with lots of photos - Sarah Kirsten

How to Easily Sew Any Size Boxy Pouch - The Math Formula Explained

Ever wondered how to do the maths to make a boxy pouch any size you want? Here’s how to do it. It’s quite simple actually. (Alternatively, if you want instructions on how to sew these pouches, head to the Pouch Pattern Calculator.)

Free Pouch Pattern Calculator - Here's how to do the math to make any size boxy pouch.
Free Pouch Pattern Calculator - Here's the math on how to make a pouch any size you want.

To figure out what length to cut the pattern piece, add your desired finished length to your desired height, plus four times the seam allowance you are going to use (if you are not using French seams, only use two times the seam allowance). The width of the pattern piece is two times your desired width plus two times your desired height plus two times the seam allowance.

Here’s an example:

Let’s say I want a pouch 8” long, 4” wide, 3” high, and to use a 0.5” seam allowance.

Length (of pattern piece) = 8” + 3” + (4 x 0.5”) = 13”

Width (of pattern piece) = (2 x 4”) + (2 x 3”) + (2 x 0.5”) = 15”

How to sew any size boxy pouch - the math made easy. By Sarah Kirsten
How to easily sew a boxy pouch any size you want - the math formula explained. By Sarah Kirsten

It’s slightly confusing because often the length of the pouch turns out to be the shorter sides of the pattern piece (not in every case however… it depends what dimensions you design your pouch). Don’t let that confuse you though. The “width” of the pattern piece is so long because it functions as the top, bottom, and both sides of the pouch while the “length” only functions as the length and half the height on each side.

Important note on the sewing: If you are using French seams on the corners, be sure that the height of the first seam on each corners is one seam allowance width shorter than your desired finished height - otherwise the pouch will turn out higher but narrower and shorter than you wanted. For example, if you want the pouch to be 5” high and are using a seam allowance of 0.5”, sew across the corners where the height is 4.5” To see a visual explanation of what I’m talking about, head to the Pouch Pattern Calculator page and look at step 9 of the pattern instructions.

If this math doesn’t look fun to you, check out my free Pouch Pattern Calculator I put together. You simply enter your desired finished length, width, height, and seam allowance and it tells you what size to cut the fabric! There are also step-by-step illustrated instructions on how to sew the pouch with lining using the French seam method that my sister and like to use.

Happy pouching! And mathing, if maths make you happy :)


Pouch Pattern Calculator

Designing your own boxy pouch with the exact dimensions you want has never been easier. Enter your desired length, width, and height of the finished pouch, and the calculator will tell you what dimensions to cut the fabric!

Pouch Pattern Calculator - Enter the dimensions of the finished pouch you want and the calculator will tell you what size to cut the fabric! Created by Sarah Kirsten

This calculator works for inches and centimeters. If using inches, the seam allowance you plan to use must be in decimal form. Common seam allowances in decimal form: 3/8 = 0.375  1/2 = 0.5  5/8 = 0.625  3/4 = 0.75

You can either design the pouch to use a zipper length commonly available, or you can trim any zipper that is longer than the needed length down to the pouch size.

If you’re curious about the math formula the calculator is using, check out this blog post. I explain the math and how you can do the formula yourself if you’re interested.


Pouch Instructions:

There are are few different methods to sew these little pouches with lining. Using the French seam method is nice because it’s fast and gives the bag more structure. Here’s how to do it.

(Note: The dimensions used in these instructions may not reflect what your pattern pieces look like. Depending on the dimensions of your pouch, your “Length” may be longer than the“Width” — unlike these illustrations. Just remember the zipper always goes on the “Length” side!)

Pouch Pattern Calculator - Enter the dimensions of the finished pouch you want and the calculator will tell you what size to cut the fabric! Created by Sarah Kirsten
1) With the dimensions provided by the Pouch Pattern Calculator, cut 1 outer layer and 1 lining. Interfacing too, if you want the pouch to have more structure.

1) With the dimensions provided by the Pouch Pattern Calculator, cut 1 outer layer and 1 lining. Interfacing too, if you want the pouch to have more structure.

2) Place the lining and outer layer with right sides together and sandwich the zipper inbetween. The right side of the zipper should be facing the outer layer. Line up the edges and sew the whole length of the seam through all layers with the seam a…

2) Place the lining and outer layer with right sides together and sandwich the zipper inbetween. The right side of the zipper should be facing the outer layer. Line up the edges and sew the whole length of the seam through all layers with the seam allowance you entered in the calculator.

If you are using interfacing, place the interfacing on the wrong side of the outer layer. (Interfacing not shown in illustrations.)

3) Flip the other edges of the fabric up and sew the ends to the other edge of the zipper using the same seam allowance.

3) Flip the other edges of the fabric up and sew the ends to the other edge of the zipper using the same seam allowance.

4) Roll and tuck the outer layer over the lining so the pouch is right side out.5) Press the fabric away from the zipper and edge stitch down each side of the zipper 1/8” | 0.32 cm from the edge of the seam.

4) Roll and tuck the outer layer over the lining so the pouch is right side out.

5) Press the fabric away from the zipper and edge stitch down each side of the zipper 1/8” | 0.32 cm from the edge of the seam.

6) With the zipper exactly in the middle of the pouch, line up the edges and sew both sides through all layers using the seam allowance you entered into the calculator.

6) With the zipper exactly in the middle of the pouch, line up the edges and sew both sides through all layers using the seam allowance you entered into the calculator.

7) Trim seam allowance to 1/4” | 0.64 cm prepare the edge for French seams.

7) Trim seam allowance to 1/4” | 0.64 cm prepare the edge for French seams.

8) Turn the pouch inside out. Press the seams flat. Sew French seams by sewing along the same seams with the seam allowance you entered in the calculator so the raw edges are totally encased by the new seams.Tip - Depending on the length of zipper y…

8) Turn the pouch inside out. Press the seams flat. Sew French seams by sewing along the same seams with the seam allowance you entered in the calculator so the raw edges are totally encased by the new seams.

Tip - Depending on the length of zipper you are using, it may be helpful to cut off some of the teeth on the end so it can bend into the French Seam more easily.

9) Turn the pouch right side out. Push out the corners of the pouch and stitch where the length across the triangles is your desired height (the height you entered in the calculator) minus your seam allowance.For example, if you want the pouch 4” hi…

9) Turn the pouch right side out. Push out the corners of the pouch and stitch where the length across the triangles is your desired height (the height you entered in the calculator) minus your seam allowance.

For example, if you want the pouch 4” high and are using a 1/2” seam allowance, you want to stitch where the triangles are 3 1/2” across.

10) Trim the triangles to a 1/4” | 0.64 cm seam allowance.

10) Trim the triangles to a 1/4” | 0.64 cm seam allowance.

11) Turn the pouch inside out. Press out seams you just sewed. Resew them with the seam allowance you entered into the calculator so the raw edges are completely encased by the new seam (French seams).

11) Turn the pouch inside out. Press out seams you just sewed. Resew them with the seam allowance you entered into the calculator so the raw edges are completely encased by the new seam (French seams).

12) Turn the pouch inside out. It’s finished! Ready to be filled with all sorts of lovely things.

Pouch Pattern Calculator - Enter the dimensions of the finished pouch you want and the calculator will tell you what size to cut the fabric! Created by Sarah Kirsten

I hope this tool can be useful to you and make drafting pouches quick and easy. If you’d like to share a pouch you’ve made using this calculator on Instagram, feel free to tag me @sarkirsten. I’d love to see what you create!

How to Install Side Release Buckles and Slide Adjusters

Tutorial How to Install Side Release Buckles and Slide Adjusters - Sarah Kirsten

This post is to complement pattern instructions for the Fennel Fanny Pack. The techniques apply to all Slide Adjusters and Side Release Buckles however.

Step 1: Install the Slide Adjuster on the long end of the webbing.

Tutorial How to Install Side Release Buckles and Slide Adjusters - Sarah Kirsten

Step 2: Install the male end of the Side Release Buckle by feeding the webbing up and around the center bar of the buckle.

Tutorial How to Install Side Release Buckles and Slide Adjusters - Sarah Kirsten

Step 3: Feed the webbing back through the Slide Adjuster, the same direction as the first time, underneath the existing webbing.

_MG_0594.jpg
Tutorial How to Install Side Release Buckles and Slide Adjusters - Sarah Kirsten

Step 4: Loop the webbing around the center bar of the Slide Adjuster. Fold the end in 1/2 in | 1.3 cm and sew the webbing to itself with two rows of stitching.

Tutorial How to Install Side Release Buckles and Slide Adjusters (with lots of photos!) - Sarah Kirsten
Tutorial (with lots of photos) - How to Install Side Release Buckles and Slide Adjusters - Sarah Kirsten

It should look something like this:

Tutorial How to Install Side Release Buckles and Slide Adjusters - Sarah Kirsten

Step 5: Insert the short side of the webbing into the female end of the Side Release Buckle. Fold the end of the webbing in 1/2 in | 1.3 cm and sew with two lines of stitching.

Tutorial How to Install Side Release Buckles and Slide Adjusters - Sarah Kirsten

Finding Thrifted Fabric

The linens section at secondhand shops are positive goldmines. Old tablecloths and curtains have such good texture, and you can’t beat the price for the yardage! Here are some recent finds from my local thrift shops. If I remember correctly, all of these were purchased for less than $3.00.

Thrifting fabric, secondhand fabric - Sarah Kirsten

Many people recommend not buying fabric unless you have a specific project in mind. I, on the other hand, think it’s a good idea to buy fabric with no project in mind. Fabric is a special thing. If you find something you love at a good price, don’t let it slip away. For many of us sewing is our main creative outlet. Having fabrics of various materials and sizes and colors on hand to play with is so important in our lives.

I love the freedom of checking my stash and picking out the right fabric for an idea the same hour it forms in my head. I love being able to play and experiment without driving to the store and waiting for new fabric to wash and dry. Our time is so limited — I want the time I dedicate to playfulness in my sewing room to be as productive as possible.

So, I believe in big stashes.

_MG_0439-2.jpg

Flannel Jumpsuit - Peppermint Mag & In the Folds Free Jumpsuit Pattern

Last winter there was a noticeable gap in my wardrobe. The house gets quite chilly in the cold months, especially in my sewing room, and I needed something warm to wear on those difficult days with… ahm…. cramps.

I wanted something that would keep my legs warm without putting any pressure on my tummy, so I printed out this free jumpsuit pattern by In the Folds for Peppermint Mag. In retrospect I didn’t need it quite this baggy and should have made a smaller size, but I think it’s bagginess is kind of endearing and it’s so comfortable.

To make it extra warm and cozy I sewed it in flannel (can you ever have too much flannel in your wardrobe?), and I just recently realized that I could pair it with my matching green flannel, self drafted, short sleeved turtle neck I made the winter before last for an even more cozy outfit.

This year I’m ready and armed with warmth for those cold days already on the way. I’m so thankful to have this piece in my wardrobe. It makes me happy having something joyful and soft and warm and cozy to put on.

Peppermint Mag & In the Folds Free Jumpsuit Pattern - Sarah Kirsten

Even though I made this mainly to wear at home, I love the bagginess and color and texture. I think I’ll wear it out and about this fall, too.

Peppermint Mag & In the Folds Free Jumpsuit Pattern - Sarah Kirsten

Notes:

The jumpsuit pattern has an invisible zipper in the back that I omitted. I deepened the V in the back by 1” or so to be sure I could slip it on without the zipper, but since I made a larger size I don’t think that was really necessary. I used French Seams instead of serging… I’m not sure why. I guess I usually prefer French seams.

The green flannel fabric is from Joann stores.

Blue shoes from Nike.

Orange trucker hat from winning the Youth Illinois Corn Husking Contest a few years ago. My favorite hat.

Persephone Pants

After sewing these Persephone Pants the direction of my wardrobe has undergone a profound shift. It feels as if my wardrobe listened to one of those incredibly insightful self help lectures or books and walked away with a deep new appreciation for a different way of thinking. Making jeans was intimidating until I started. I was quickly swept away in the current of sewing. Anna’s instructions are so easy and fun to follow it’s like a book you can’t put down. You traverse without halt from one step to the next, scarcely noticing the beginning or ending of chapters.

These pants make me want to get rid of nearly all my non-memade clothes and just sew everything from now on. They feel so good. I mean not just physically — it feels so good to put on a pair of jeans that you made yourself. They bring me so much joy. I want all my clothes to bring me this much joy.

Thank you, Anna, for all of your hard work on this pattern. I so appreciate your creation.

Sewing the Persephone Pants - Sarah Kirsten

Notes:

These are a size 0 with an extra 3/8” taken off the center back of the pattern piece. I think next time I’ll make them even a bit smaller so they stay tight as the fabric relaxes with wear. Instead of buttons I used snaps for the fly.

The bright orange fabric is Duck Canvas from Joann stores.

This yellow shirt is a rayon knit from Salvation Army thrift store several years ago.

Blue shoes are Nike (found on clearance!).

16 Tips for Self Drafting Freedom

FREE - 16 tips to help you start drafting
FREE - 16 tips to help you get started self drafting

When I think of sewing, I think about the opportunity to create, to explore, to express. It's a glorious thing to not leave the design and creation of your self expression totally up to others. You have uniqueness in you that deserves to be manifested and shown. You are worthy of spending time and energy and money and paper and fabric on figuring out how to express those things inside of you in the form of clothing! You uniqueness is worthy and deserving of being explored and showed in a physical form. 

If you want to start drafting but feel held back for whatever reason, these tips are for you. These are things I have learned that have been very helpful in my self drafting journey. I hope they can be a help and encouragement to you on your journey of self expression through self drafting. 


16 Tips for Self Drafting Freedom

A download to the PDF will be sent directly to your inbox!

    Puffy Wool Vest

    Puffy Wool Quilted Vest - Sarah Kirsten Blog

    Puffy quilted vests have been on my mind (which is why I put this tutorial together). I decided NOW IS THE TIME to make one!


    These photos are by my friend, Kelby Maria, who is a professional photographer in the Portland area. It was a real treat to have her visit my sewing space and take these photos! Thank you, Kelby! <3

    The ring I’m wearing in the photos is by the jewelry designer Aningri. I don’t wear a lot of jewelry, but I love to wear this ring because it’s slim and simple. It’s one of those rare pieces that I feel like I’M wearing instead of IT wearing me.

    Puffy Wool Vest - Sarah Kirsten Blog
    Puffy Wool Vest - Sarah Kirsten Blog

    I drafted a quick pattern, cut out all the pieces and sewed them together, and then used the same pattern pieces to cut out wool batting for the puff and insulation. My mom sent a truck load of our sheep’s wool to a mill and had it made into batting. The wool is quite easy and fun to work with in batting form.

    Once the vest was sewn together with the bottom left open, I stuffed the batting inside the vest and hand stitched it together on the shoulders and sides. I think I stuffed a little too much in the shoulder section because they kind of stick out. That can probably be rearranged with some hand shaping though.

    For the quilting stitching, I measured evenly spaced segments and placed scotch tape lines as stitching guides. It’s a bit of a pain to peel off the scotch tape if you stitch through it, but overall I think it that trick works quite well.

    Next I want to make one with a collar and pockets and snaps. I underestimated how puffy the wool was going to be on this draft. I’ll also make it a bit bigger in the next draft and overlap the batting on the shoulders a little less.

    How to Sew a Lined Vest - Two Easy Methods

    Sewing tutorial - Two methods of sewing a lined vest - with tons of photos

    Have you ever wondered how to sew a lined vest without any raw edges showing? Wonder no more! Here are two ways to do it. The first method has open shoulders and the second has the shoulders sewn shut.

    The pattern used in this tutorial is a self drafted miniature vest.

    I purposely choose fabric for this tutorial that you can easily see the right and wrong sides and differentiate the lining from the outer layer.

    Method One: Open Shoulders

    Step 1: Cut all the pieces - lining and outer layer.

    How to sew a lined vest - Sewing tutorial with tons of photos

    Step 2: Sew the shoulders of the outer layers together and the shoulders of the lining layers together with right sides together.

    How to sew a lined vest - Sewing tutorial with photos

    Step 3: Lay the two layers with right sides together. Press seams open and stitch from the bottom of the front center up around the neck and back down the front center of the other side. (If you look closely in the photo you can see white thread where I’ve stitched!)

    How to sew a lined vest - Sewing tutorial with photos
    How to sew a lined vest - two methods for sewing a lined vest

    Step 4: Stitch around the arm holes on each side. Don’t sew down the sides, just the arm holes.

    How to sew a lined vest - Sewing tutorial with photos

    Step 5: Clip curves and trim corners.

    How to sew a lined vest - easy to understand sewing tutorial
    How to sew a lined vest - easy to understand sewing tutorial

    Step 6: Turn the vest right side out through the shoulders.

    How to sew a lined vest - easy to understand sewing tutorial

    Step 7: Press the seams open and sew up the sides with right sides together. (This part is tricky to explain and photograph clearly, but it makes sence once you get it! Just play around with it a little bit.)

    How to sew a lined vest - easy to understand sewing tutorial

    Be sure to match up the seams. (This is the side seam right by the arm opening.)

    How to sew a lined vest - easy to understand sewing tutorial

    Here’s what it looks like with the sides sewn together.

    How to sew a lined vest - easy to understand sewing tutorial

    Step 8: Now that the side seams are sewn, admire how good your vest is looking so far.

    How to sew a lined vest - easy to understand sewing tutorial
    How to sew a lined vest - easy to understand sewing tutorial

    Step 9: Turn the vest inside out. Press the seams open and sew the bottom of the vest leaving a few inches open in the back. The thicker the fabric the wider you want to leave the hole for turning the vest right side out.

    How to sew a lined vest - easy to understand sewing tutorial

    Since turning the vest can put a lot of stress on the stitching, it works well to sew down to the bottom edge of the fabric to add extra stability. It makes for much less stressful turning!

    How to sew a lined vest - easy to understand sewing tutorial

    Step 10 & 11: Clip the corners. Turn the vest inside out through the opening in the back and hand or machine stitch the opening closed.

    How to sew a lined vest - easy to understand sewing tutorial
    How to sew a lined vest - easy to understand sewing tutorial

    Give the vest a good press and it’s ready to wear!

    Sewing Tutorial - Two methods for sewing a lined vest with tons of photos
    Sewing Tutorial - Two methods for sewing a lined vest with tons of photos

    Method Two: Closed Shoulders

    Step 1: Cut out all the pieces - the lining and the outer layer.

    How to sew a lined vest - Sewing tutorial with photos

    Step 2: Lay the lining and the outer layers right sides together. Sew around the neck and arm openings on the back pieces. Sew around the arms, neck, and front center of the front pieces.

    How to sew a lined vest - Sewing tutorial with photos
    How to sew a lined vest - Sewing tutorial with photos

    Step 3: Clip the curves, trim the corners, and trim the seam allowance at the top of the arm openings and neck by the shoulders.

    How to sew a lined vest - Sewing tutorial with photos
    How to sew a lined vest - Sewing tutorial with photos

    Step 4: Turn the front vest pieces right side out.

    How to sew a lined vest - Sewing tutorial with photos

    Step 5: Put the front vest pieces in between the lining and outer layer of the back piece.

    How to sew a lined vest - Sewing tutorial with photos
    How to sew a lined vest - Sewing tutorial with photos

    Step 6: Sew the shoulders closed.

    How to sew a lined vest - Sewing tutorial with photos
    How to sew a lined vest - Sewing tutorial with photos

    Step 7: Press seams open and sew the sides of the vest with right sides together.

    How to sew a lined vest - Sewing tutorial with photos

    Be sure to match up the side seams.

    How to sew a lined vest - Sewing tutorial with photos

    Here’s what it looks like when the sides are sewn together.

    How to sew a lined vest - Sewing tutorial with photos

    Step 8: Turn the vest right side out and admire how it’s looking so far.

    How to sew a lined vest - Sewing tutorial with photos
    How to sew a lined vest - Sewing tutorial with photos

    Step 9: Turn the vest inside out (one last time), press the seams open and sew the bottom shut leaving a few inches open in the back.

    How to sew a lined vest - Sewing tutorial with photos
    How to sew a lined vest - sewing tutorial with tons of photos by Sarah Kirsten

    Step 10: Trim the corners.

    How to sew a lined vest - Sewing tutorial with photos

    Step 11: Turn the vest right side out (for the last time) through the opening in the back. Hand or machine stitch the opening shut.

    How to sew a lined vest - Sarah Kirsten sewing tutorial with tons of photos

    Give the vest a good press and try it on to see how it looks.

    How to sew a lined vest - Sewing tutorial with tons of photos by Sarah Kirsten
    How to sew a lined vest - Sewing tutorial with tons of photos by Sarah Kirsten

    Discussion notes:

    In both of these examples I left the opening to turn the vest right side out on the bottom seam. It’s also a good option to leave the opening in the side seam of the lining instead of in the bottom.

    The pattern used in this tutorial was a mini self drafted vest for easy sewing and photographing, but I used the pattern to make this little quilted vest with snaps. I used the open shoulder method for this vest so I could put the batting through the shoulders. I’m quite in love with how it turned out.

    How to sew a lined vest - sewing tutorial with tons of photos by Sarah Kirsten

    Then I made this full sized quilted vest for myself. For the batting I used wool from my parents’ sheep farm and a really lightweight ripstop nylon for the outer shell. I again used the open shoulder method to get batting up through the shoulders.

    How to sew a lined vest - sewing tutorial with tons of photos by Sarah Kirsten

    How to Make Pattern Weights

    After a while of using various heavy objects from around my sewing room as pattern weights — my extra scissors, my ceramic thread collection creamer from Vivian Shao Chen, a big roll of cut-to-length zipper, my iPhone, etc., I decided it was time to upgrade.

    I found all these large washers in our Nuts & Bolts Bucket (you know, the bucket in the garage where you put all the spare nuts and bolts in case you need them for a project sometime). I asked Dad if I could use the washers, took them inside and gave them a bath to wash off some grease, and then set to work making them little baggies.

    I decided to put 4 washers in each bag. But, obviously, depending on how big of washers you are using, you may want to add more or less than that to each bag. These washers and other heavy objects like massive bolts are easily findable at most hardware stores for relatively inexpensive prices.

    Here’s a quick photo tutorial of how I made the baggies and how you can make your own.

    Mini tutorial - how to make your own pattern weights. Sarah Kirsten
    Mini tutorial - how to make your own pattern weights. Sarah Kirsten
    Mini tutorial - how to make your own pattern weights. Sarah Kirsten
    Mini tutorial - how to make your own pattern weights. Sarah Kirsten
    Mini tutorial - how to make your own pattern weights. Sarah Kirsten
    Mini tutorial - how to make your own pattern weights. Sarah Kirsten
    Mini tutorial - how to make your own pattern weights. Sarah Kirsten
    Mini tutorial - how to make your own pattern weights. Sarah Kirsten
    Mini tutorial - how to make your own pattern weights. Sarah Kirsten
    Mini tutorial - how to make your own pattern weights. Sarah Kirsten

    That’s it! Sew EASY and an excellent use for scraps!

    FREE Sewing Pattern - Pear Pouch

    After posting a photo of these little Pear Pouches on Instagram a few months ago, I've had soo many messages asking for this sewing pattern. So here it is! 

    Download PDF Here!

    Features:

    • Two sizes of pouches

    • Fully lined

    • French Seamed

    • Ideal for altering and making your own sizes and dimensions.

    Finished Dimensions (H x W x L):

    • Large pouch: 6" x 3 1/2" x 9"

    • Small pouch: 4 1/2" x 3" x 7"

    I hope this pattern can serve as a reference on how to sew lining with a zipper, how to sew zipper ends, how to sew French seams, and offer a good base pattern to alter if you would like to make your own sizes of pouches. 

    How to Flower Pound

    Right outside our kitchen is a little green patio area we call the Kitchen Garden. Among numerous fragrant herb species is a beautiful clematis plant with sprawling tendrils and an abundance of flowers. 

    Last summer I discovered the wonders of flower pounding. Through some experimenting I found that clematis flowers work exceptionally well and retain their colorfastness on fabric. I have a tank top that I pounded with clematis flowers and although the flowers turned brown, their imprint has remained vibrant through it's many washing machine cycles.

    So here's how to flower pound:

    Step 1: Pick some beautiful flowers. 

    sarah-kirsten-flower-pounding01

    Step 2: Lay a flower on a piece of cloth. 

    sarah-kirsten-flower-pounding02
    sarah-kirsten-flower-pounding03

    Step 3: Fold the fabric over top (or lay another piece on top), place it on something hard and smooth, then pound the entirety of the flower. If you don't have a hard, smooth surface, try placing a towel on the sidewalk and hammering into the towel.

    I made the mistake of pounding flowers on a brand new linen shirt I just finished sewing on a sidewalk without a towel underneath and the roughness of the cement put holes in the fabric! 

    sarah-kirsten-flower-pounding04
    sarah-kirsten-flower-pounding06
    sarah-kirsten-flower-pounding07

    Step 4: Unfold and peel off the remains of the flower. 

    sarah-kirsten-flower-pounding09

    Step 5: Hold up your cloth and stare at it for a few minutes. Then make another one! After waiting a few days, it should be safe to machine wash if you're putting it on a piece of clothing. 

    sarah-kirsten-flower-pounding10

    I've found that it works for lots of other leaves and flowers, too! But I can't vouch for how they will all hold up in the wash. 

    sarah-kirsten-flower-pounding11
    sarah-kirsten-flower-pounding12

    Here's a shirt I flower pounded with Clematis flowers from our Kitchen Garden. 

    Easy guide to flower pounding
    Easy guide to flower pounding your own clothes