The Easiest Way to Sew Zipper Ends

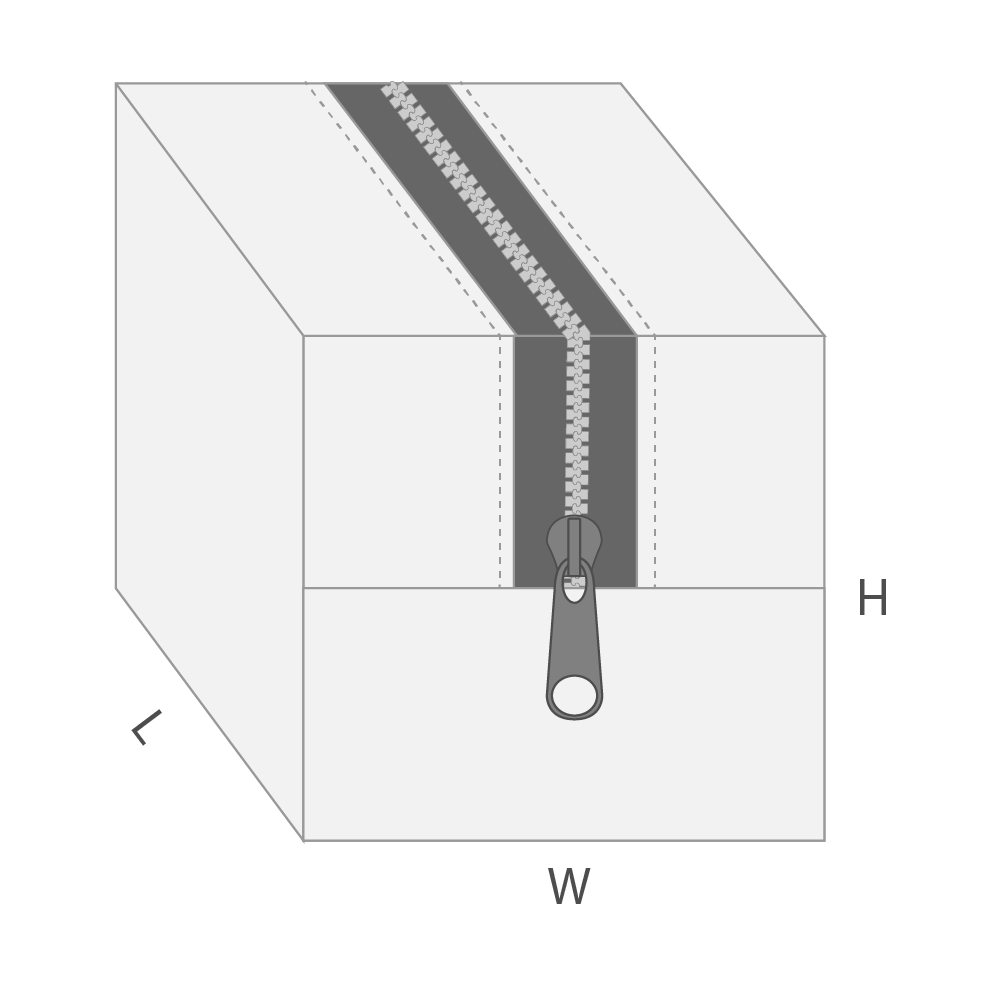
Whether you are using a cut-to-length zipper (my personal favorite) or a regular zipper, the need sometimes arises to sew a nice fabric patch on the end of the zipper. Of all the ways to do this (most are terribly frustrating), this is the best method I’ve used. It’s reliable - works every time. It’s quick - only takes about a minute total. It looks neat - no raw edges which makes it good for a variety of applications. And best of all, it’s the least fussy - it’s easy to get the fabric lined up and sewn straightly.

Here’s how to do it.

1) Cut a rectangle of fabric about 4” (10 cm) long and 1/2” (1.3 cm) wider than the width of the zipper.

The easiest way to sew zipper ends - Tutorial by Sarah Kirsten

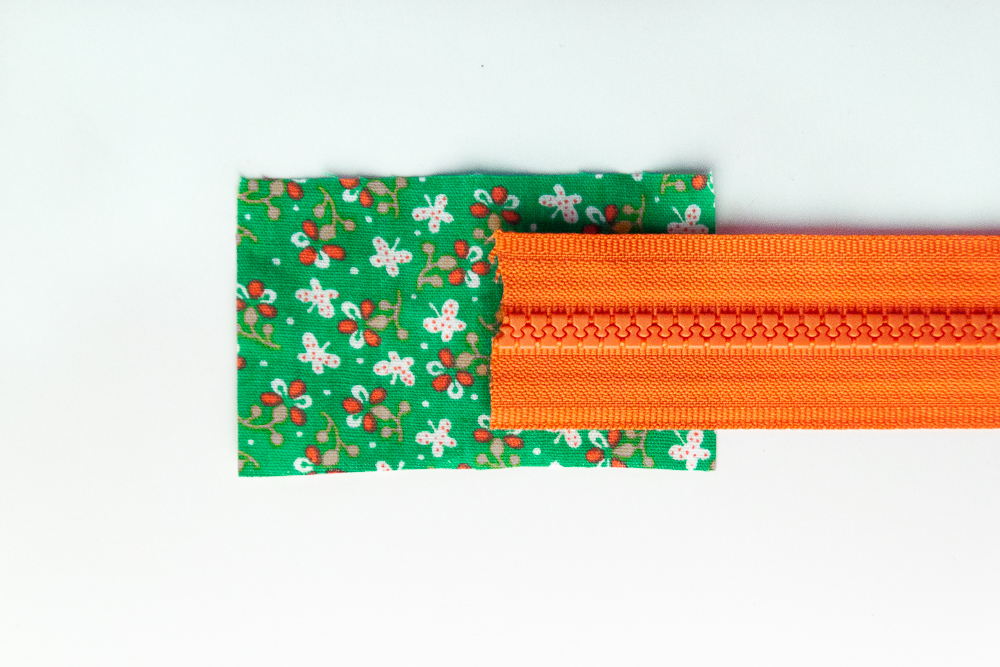
2) Fold the rectangle in half with right sides together. Sew both sides with a 1/4” (0.64 cm) seam allowance.

The easiest way to sew zipper ends - Tutorial by Sarah Kirsten

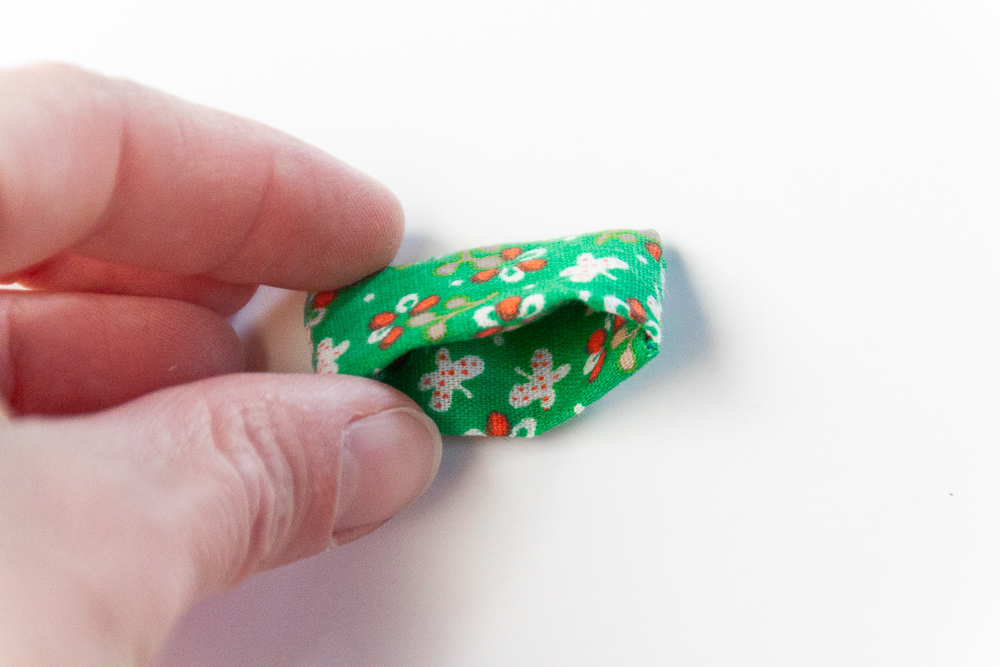
3) Turn the fabric right side out.

_MG_0765.jpg

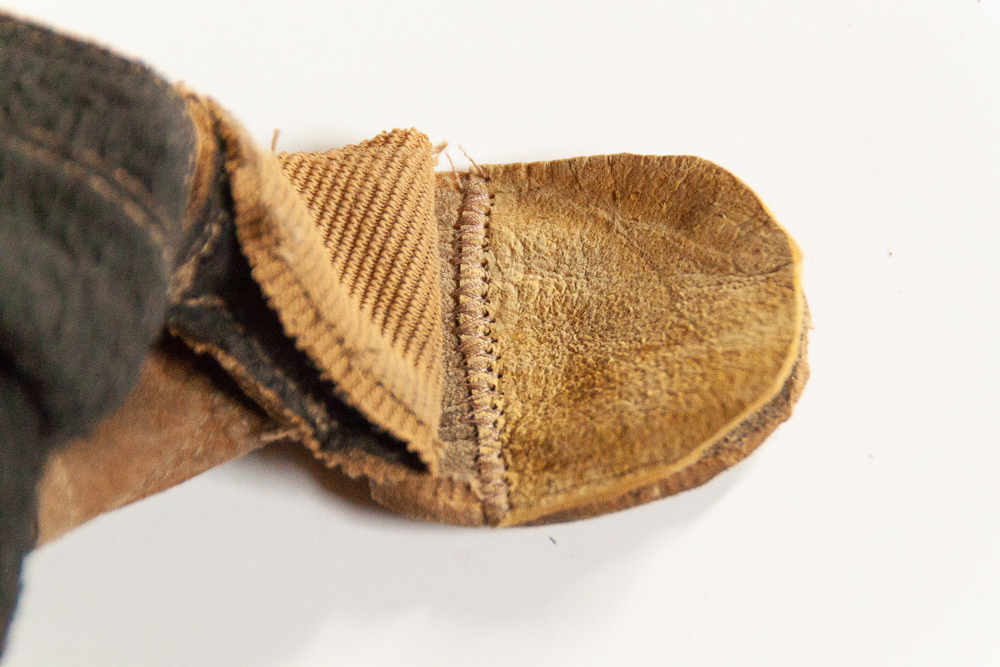
4) Fold the top inside the little pouch so that the top of the fabric reaches all the way to the bottom.

The easiest way to sew zipper ends - Tutorial by Sarah Kirsten

5) Make sure the folded edge of the pouch is even all the way around. Insert the zipper inside. (Note: Depending on the application you’re using it for and the type of zipper, you may want to remove some zipper teeth so you don’t sew over them.)

The easiest way to sew zipper ends - Tutorial by Sarah Kirsten

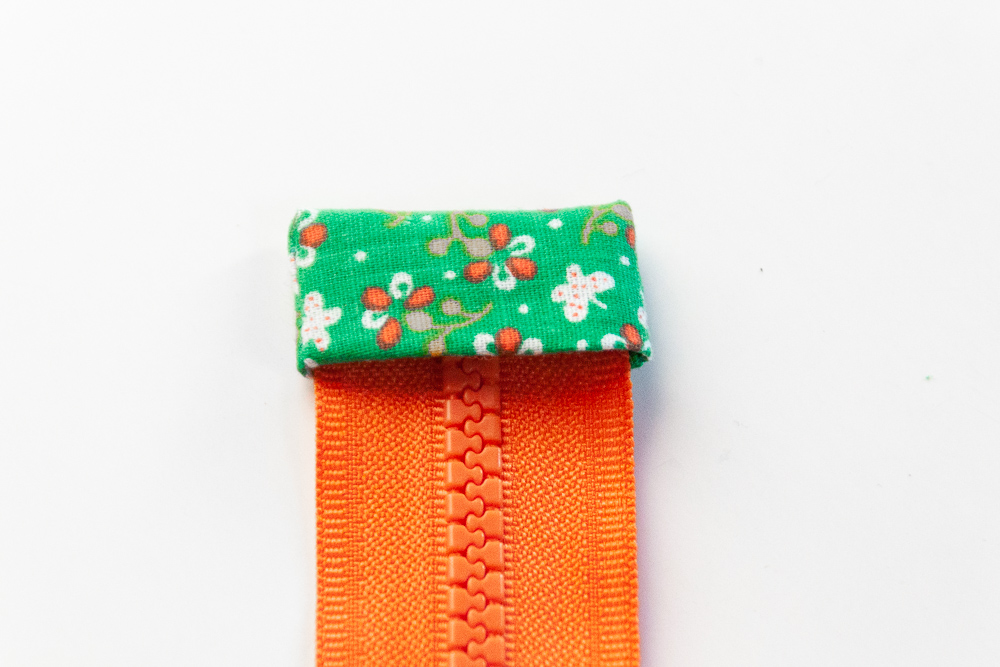
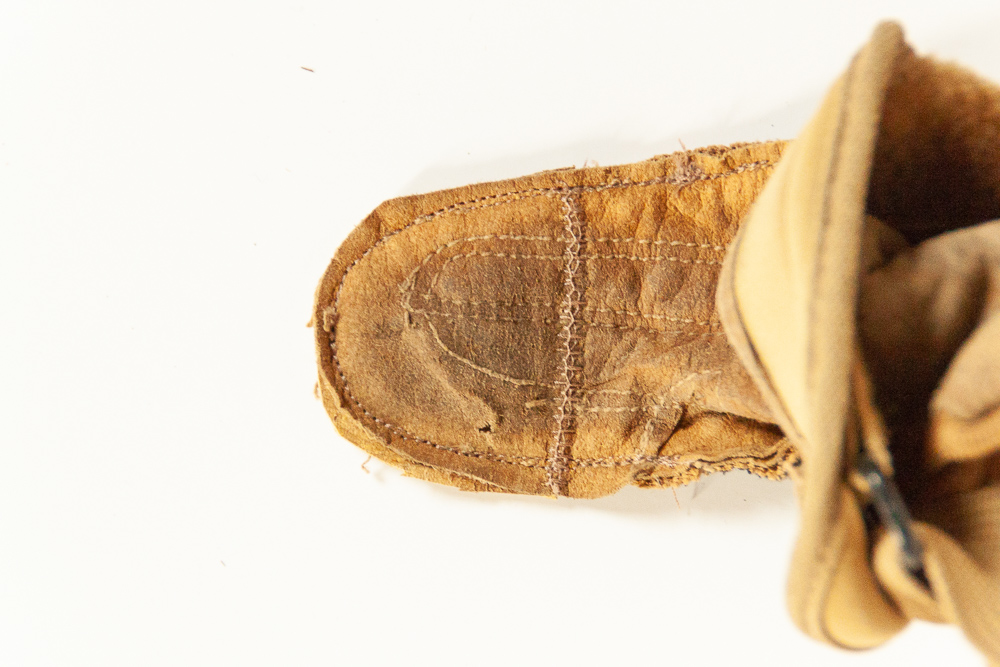
6) Stitch near the top of the pouch through all layers.

The easiest way to sew zipper ends - Tutorial by Sarah Kirsten

That’s it! You’re done.

In my free Pear Pouch Pattern I use a different method, but this would be an excellent alternative. In fact, this is, simply put, a better method. More reliable and less fussy all around.

Getting My Closet Down to 106 Pieces

The joys of a small wardrobe - Getting my closet down to 106 pieces - Sarah Kirsten

I recently ran across an infographic on Pinterest. A woman started with 450 items in her closet and pruned it down to 65. It got me thinking… what’s in my closet?

I counted, it was about 200.

It would be a stretch for me to get down to 65 pieces. I need clothes for Iowa summers, winters, springs & falls (if you’re not familiar with Iowa weather, it ranges from humid and hot to bitter cold), clothes for farm work (I live on a sheep farm), clothes for outdoor activities (kayaking, climbing, cycling, running, swimming, hiking, camping, etc), nice clothes for going out and about, clothes for staying home and being cozy. It feels like a lot of targets to hit. Many of the categories overlap though. The clothes I like to take on cycling or climbing trips are similar to what I wear on normal summer days, for example.

With the goal of getting my closet number as low as I could stand, I pulled out clothes:

  • I don’t actually like

  • I feel obligated to keep

  • I like and hope to wear someday but never do

  • I used to like but don’t wear anymore

  • I don’t feel happy wearing or looking at on my shelves

I was able to purge around 90 pieces and get my wardrobe down to 106.

The benefits of pruning my closet down to 106 pieces - Sarah Kirsten

So, what’s in my closet?

I’ve divided my wardrobe into categories of uses.

Everyday - wearing around the house

Workout - gym, etc.

Adventure - cycling trips, climbing, kayaking, hiking, etc.

Farm - farm work and daily chores (and other messy things like painting, etc.)

Nice - going out with friends, on trips, going for tea or errands, etc.

Here’s what’s in my closet:

  • 8 shorts - everyday / workout / adventure / farm / nice

  • 11 pants - everyday / workout / adventure / farm / nice

  • 7 long sleeve tops - everyday / workout / adventure / farm

  • 11 short sleeve tops - everyday / farm / nice

  • 7 tank tops - everyday / workout / farm / nice

  • 12 button up shirts / jackets - everyday / adventure / farm / nice

  • 1 vest - nice

  • 9 sweaters - everyday / farm / workout / adventure / nice

  • 3 wind breakers - workout

  • 2 rain jackets - nice

  • 2 winter coats - everyday / nice

  • 19 dresses - everyday / nice

  • 8 skirts - everyday / nice

  • 6 jumpers - everyday

Getting my closet down to 106 pieces - Sarah Kirsten

Insights

I’m so glad did this because it give me some valuable insights into my wardrobe. I will quickly outline them here:

1) It helped me realize what I need to work on sewing/adding to build a strong, well rounded closet. I need more nice jeans, more gym clothes.

2) My room is a happier place and I’m a happier person without things I don’t actually like sitting on my shelves.

3) Getting dressed in the morning takes less time and is more (way more) fun.

4) Only 7 pieces in my closet are things I bought new. The rest are sewn, thrifted, or secondhand from family and some friends. I don’t know if that’s good or bad but it’s just interesting!

5) I would like to transition my closet to almost all memade items. It just feels nice to surround yourself with good quality clothes that are made by you.

6) Much of my summer wardrobe is memade and most of my winter wardrobe is not. It would be nice to even the balance.

7) Since I work from home, I tend to not wear my nice clothes around the house in case I want to wear them out in the evenings or weekends. I want to keep them fresh so I have options. My epiphany while cleaning was if I just made myself more nice things (if I had more than 2 pairs of nice jeans) then I could wear nice clothes around the house AND have nice clothes to wear out and about.

8) Echoing #7, I’m happier when I wear nice clothes around the house. They make me feel good.


With some practice I think I can get my wardrobe number even lower. I already feel myself being more willing to give things up after experiencing a taste of the joy of only having what you really love. I’m so happy I cleared out my closet!

PS - I wasn’t exactly sure where to draw the line on the numbers, so I want to just mention that I also have 6 swimming suits (I do wear them all…), snow pants and jacket for winter sports, 5 pieces for cycling - shorts, jersey, winter leggings, rain jacket, and rain pants, and lastly some insulated winter overalls and a coat both used for farm chores.

How to Repair Work Gloves with Holes in the Fingers

How to repair work gloves with holes in the fingers. Tutorial with lots of photos - Sarah Kirsten

Three winters ago my mom bought me a new pair of leather gloves for the daily farm chores. They have been my best pair yet, but unfortunately they are already full of holes in almost all the finger tips. I think mine are a little beyond the repair stage (practically speaking). It’s an on-going problem — farm gloves that wear out too quickly.

Our neighbor said he has the same problem with his farm gloves and sent me this video of how to repair them. The video made it look so simple that I wanted to try it out. I asked if I could repair his gloves. It turns out it IS really simple and surprisingly easy. Here’s how to do it.

How to repair work gloves with holes in the fingers. Tutorial with lots of photos - Sarah Kirsten

Step 1: Turn the gloves inside out and seam rip around the panel containing the hole.

How to repair work gloves with holes in the fingers. Tutorial with lots of photos - Sarah Kirsten

Step 2: Cut out the piece with the hole.

How to repair work gloves with holes in the fingers. Tutorial with lots of photos - Sarah Kirsten

Step 3: Using the piece with a hole as a pattern, cut out a new piece of leather (or fabric). Make the new piece 1/4” - 3/8” | 0.64 - 1 cm longer than the piece you cut out from the glove.

How to repair work gloves with holes in the fingers. Tutorial with lots of photos - Sarah Kirsten

Step 4: Overlap the new piece with the existing finger panel and zigzag stitch them together along both edges (the edge of the new piece and the edge of the existing piece).

How to repair work gloves with holes in the fingers. Tutorial with lots of photos - Sarah Kirsten

Step 5: Starting from the top of the finger, sew down each side. Stitch over the whole thing 2 - 3 times to reinforce the stitching.

How to repair work gloves with holes in the fingers. Tutorial with lots of photos - Sarah Kirsten

Step 7: Turn the glove right side out and admire the new finger!

How to repair work gloves with holes in the fingers. Tutorial with lots of photos - Sarah Kirsten

- Alternative Method -

On the thumb I tried a different method, and I ended up liking it more. Instead of cutting out the old piece just add a new piece on the outside and sew it back up!

Step 1: Seam rip around the panel containing the hole (or in this case, the soon-to-be-hole) and cut a matching piece of leather that extends past the holey area.

How to repair work gloves with holes in the fingers. Tutorial with lots of photos - Sarah Kirsten

Step 2: Zigzag stitch the bottom of the new piece to the outside of the existing piece.

How to repair work gloves with holes in the fingers. Tutorial with lots of photos - Sarah Kirsten

Step 3: Starting from the top of the finger, sew down each side. Stitch over the whole thing 2 - 3 times to reinforce the stitching.

How to repair work gloves with holes in the fingers. Tutorial with lots of photos - Sarah Kirsten

Step 4: Turn the glove right side out and you’re done!

How to repair work gloves with holes in the fingers. Tutorial with lots of photos - Sarah Kirsten

Ready for another cold winter on the farm :)

How to repair work gloves with holes in the fingers. Tutorial with lots of photos - Sarah Kirsten

How to Easily Sew Any Size Boxy Pouch - The Math Formula Explained

Ever wondered how to do the maths to make a boxy pouch any size you want? Here’s how to do it. It’s quite simple actually. (Alternatively, if you want instructions on how to sew these pouches, head to the Pouch Pattern Calculator.)

Free Pouch Pattern Calculator - Here's how to do the math to make any size boxy pouch.
Free Pouch Pattern Calculator - Here's the math on how to make a pouch any size you want.

To figure out what length to cut the pattern piece, add your desired finished length to your desired height, plus four times the seam allowance you are going to use (if you are not using French seams, only use two times the seam allowance). The width of the pattern piece is two times your desired width plus two times your desired height plus two times the seam allowance.

Here’s an example:

Let’s say I want a pouch 8” long, 4” wide, 3” high, and to use a 0.5” seam allowance.

Length (of pattern piece) = 8” + 3” + (4 x 0.5”) = 13”

Width (of pattern piece) = (2 x 4”) + (2 x 3”) + (2 x 0.5”) = 15”

How to sew any size boxy pouch - the math made easy. By Sarah Kirsten
How to easily sew a boxy pouch any size you want - the math formula explained. By Sarah Kirsten

It’s slightly confusing because often the length of the pouch turns out to be the shorter sides of the pattern piece (not in every case however… it depends what dimensions you design your pouch). Don’t let that confuse you though. The “width” of the pattern piece is so long because it functions as the top, bottom, and both sides of the pouch while the “length” only functions as the length and half the height on each side.

Important note on the sewing: If you are using French seams on the corners, be sure that the height of the first seam on each corners is one seam allowance width shorter than your desired finished height - otherwise the pouch will turn out higher but narrower and shorter than you wanted. For example, if you want the pouch to be 5” high and are using a seam allowance of 0.5”, sew across the corners where the height is 4.5” To see a visual explanation of what I’m talking about, head to the Pouch Pattern Calculator page and look at step 9 of the pattern instructions.

If this math doesn’t look fun to you, check out my free Pouch Pattern Calculator I put together. You simply enter your desired finished length, width, height, and seam allowance and it tells you what size to cut the fabric! There are also step-by-step illustrated instructions on how to sew the pouch with lining using the French seam method that my sister and like to use.

Happy pouching! And mathing, if maths make you happy :)


Pouch Pattern Calculator

Designing your own boxy pouch with the exact dimensions you want has never been easier. Enter your desired length, width, and height of the finished pouch, and the calculator will tell you what dimensions to cut the fabric!

Pouch Pattern Calculator - Enter the dimensions of the finished pouch you want and the calculator will tell you what size to cut the fabric! Created by Sarah Kirsten

This calculator works for inches and centimeters. If using inches, the seam allowance you plan to use must be in decimal form. Common seam allowances in decimal form: 3/8 = 0.375  1/2 = 0.5  5/8 = 0.625  3/4 = 0.75

You can either design the pouch to use a zipper length commonly available, or you can trim any zipper that is longer than the needed length down to the pouch size.

If you’re curious about the math formula the calculator is using, check out this blog post. I explain the math and how you can do the formula yourself if you’re interested.


Pouch Instructions

There are are few different methods to sew these little pouches with lining. Using the French seam method is nice because it’s fast and gives the bag more structure. Here’s how to do it.

(Note: The dimensions used in these instructions may not reflect what your pattern pieces look like. Depending on the dimensions of your pouch, your “Length” may be longer than the“Width” — unlike these illustrations. Just remember the zipper always goes on the “Length” side!)

Pouch Pattern Calculator - Enter the dimensions of the finished pouch you want and the calculator will tell you what size to cut the fabric! Created by Sarah Kirsten
1) With the dimensions provided by the Pouch Pattern Calculator, cut 1 outer layer and 1 lining. Interfacing too, if you want the pouch to have more structure.

1) With the dimensions provided by the Pouch Pattern Calculator, cut 1 outer layer and 1 lining. Interfacing too, if you want the pouch to have more structure.

2) Place the lining and outer layer with right sides together and sandwich the zipper inbetween. The right side of the zipper should be facing the outer layer. Line up the edges and sew the whole length of the seam through all layers with the seam a…

2) Place the lining and outer layer with right sides together and sandwich the zipper inbetween. The right side of the zipper should be facing the outer layer. Line up the edges and sew the whole length of the seam through all layers with the seam allowance you entered in the calculator.

If you are using interfacing, place the interfacing on the wrong side of the outer layer. (Interfacing not shown in illustrations.)

3) Flip the other edges of the fabric up and sew the ends to the other edge of the zipper using the same seam allowance.

3) Flip the other edges of the fabric up and sew the ends to the other edge of the zipper using the same seam allowance.

4) Roll and tuck the outer layer over the lining so the pouch is right side out.5) Press the fabric away from the zipper and edge stitch down each side of the zipper 1/8” | 0.32 cm from the edge of the seam.

4) Roll and tuck the outer layer over the lining so the pouch is right side out.

5) Press the fabric away from the zipper and edge stitch down each side of the zipper 1/8” | 0.32 cm from the edge of the seam.

6) With the zipper exactly in the middle of the pouch, line up the edges and sew both sides through all layers using the seam allowance you entered into the calculator.

6) With the zipper exactly in the middle of the pouch, line up the edges and sew both sides through all layers using the seam allowance you entered into the calculator.

7) Trim seam allowance to 1/4” | 0.64 cm prepare the edge for French seams.

7) Trim seam allowance to 1/4” | 0.64 cm prepare the edge for French seams.

8) Turn the pouch inside out. Press the seams flat. Sew French seams by sewing along the same seams with the seam allowance you entered in the calculator so the raw edges are totally encased by the new seams.Tip - Depending on the length of zipper y…

8) Turn the pouch inside out. Press the seams flat. Sew French seams by sewing along the same seams with the seam allowance you entered in the calculator so the raw edges are totally encased by the new seams.

Tip - Depending on the length of zipper you are using, it may be helpful to cut off some of the teeth on the end so it can bend into the French Seam more easily.

9) Turn the pouch right side out. Push out the corners of the pouch and stitch where the length across the triangles is your desired height (the height you entered in the calculator) minus your seam allowance.For example, if you want the pouch 4” hi…

9) Turn the pouch right side out. Push out the corners of the pouch and stitch where the length across the triangles is your desired height (the height you entered in the calculator) minus your seam allowance.

For example, if you want the pouch 4” high and are using a 1/2” seam allowance, you want to stitch where the triangles are 3 1/2” across.

10) Trim the triangles to a 1/4” | 0.64 cm seam allowance.

10) Trim the triangles to a 1/4” | 0.64 cm seam allowance.

11) Turn the pouch inside out. Press out seams you just sewed. Resew them with the seam allowance you entered into the calculator so the raw edges are completely encased by the new seam (French seams).

11) Turn the pouch inside out. Press out seams you just sewed. Resew them with the seam allowance you entered into the calculator so the raw edges are completely encased by the new seam (French seams).

12) Turn the pouch inside out. It’s finished! Ready to be filled with all sorts of lovely things.

Pouch Pattern Calculator - Enter the dimensions of the finished pouch you want and the calculator will tell you what size to cut the fabric! Created by Sarah Kirsten

If you enjoyed this, you may also enjoy the Tote Bag Calculator. It works the same way as the Pouch Pattern Calculator. Enter the length, width, and height of your desired tote and it will calculate what dimensions to cut the fabric.